
4. Order-mode and Order-typeadd chapter
The BCS-2® software facilitates the completion and administration of entire scan orders. Different Order-Types, which can be edited, make a productive and versatile working with BCS-2® easy. Furthermore BCS-2® allows you to define your own Order-Types, which will be explained later in the manual (see dynamic order types).Once all pages of an order have been scanned, the order itself can be saved, printed, transferred or sent to a desired location. Orders can also be effortlessly exported from, and imported into BCS-2®.
4.1 Basic Order-Types add section
Three basic order-types are predefined in BCS-2®:
Single
A pseudo order-type in BCS-2® for single scans, therefore not suited for piles of images i.e. scans. This order-type is mainly used for testing purposes. Transferring an order is not possible. The images of the order-mode “Single” are saved by default in the scan data directory, which is easily accessible over the menu point About BCS-2 in the Help menu.
Simple
The simplest order-type. No order indexes are available or necessary for “Simple” orders. Transferring an order will copy the images to a target location (by default “C:\Simple”) without the creation of sub-folders.
Standard
The standard order-type for individual setups. Up to nine Order Indexes can be freely defined. If desired, these nine indexes can be coded as barcodes on the cover sheet (first page) of the order. The barcode areas for each index can also be freely defined with BCS-2®. Transferring the images leads to the creation of a new folder within the target directory for “Standard” orders into which the images are then transferred. The name of this new folder consists of the corresponding order number. In addition to the images a small ASCII file labeled “order.sum” will be created, containing the most important data of the order.
4.2 Additional Order-Types add section
BCS-2® also supports a series of optional and additional order-types, which in part require their own license:
Medea3
This order-type is use to comunicate between the document-delivery system Medea3 and BCS-2®
MyBib eDoc
Order-type to use BCS2® as scan-client for MyBib eDoc, a web based document-delivery system for fast and cost-efficient deliverance of non-returnable documents (Scan-on-Demand)
Subito
Order-type to work with BCS2® as scan-client in a SUBITO-enviroment
4.3 Selecting an Order-Type add section
In order to process a scan order with BCS-2® it is necessary to choose an order-type, to do so, simply select the appropriate order-type from the dropdown menu in the Order Bar.
The order-type implies a certain order-mode (setting and workflow), for which as a general rule scan and post processing functions, as well as transfer targets have already been configured. The order-type “Single” as a standalone scan-type/mode is the only exception.
Before an order is created or opened, the Order Options should be checked and, if necessary, adjusted.
4.4 Working in the Order-Mode add section
Caution: Please make sure that you have selected the correct Order–Type (see above) because the Order-Type defines the Order-Mode.
4.4.1 Creating an Order
Orders can be created either by selecting the menu point Create in the Order menu or by pressing the Scan button. The Order-Mode will always be corresponding to the Order-Type selected beforehand in the Order Bar, it is not possible to change the Order-Type in an open order. The Order bar will extend after an order was initiated, it will then display additional buttons and functions.
4.4.2 Order Bar

Scan
It triggers the scan process, alternatively the key combination CTRL+S can be used to start scanning.
To remove an unsatisfactory scan press the DEL key, or the corresponding button in the Tool Bar, the image that is currently displayed in the Image viewer together with its thumbnail will then be deleted. In all order-modes, except the “Single Type”, a confirmation request will appear. To insert images at a certain position, select the image/thumbnail that is to be in front the new image, all new scans will then be inserted behind this image. Remember to select the last image of the order when you have finished inserting pictures and wish to return to the normal scan process.
Rescan
The image currently selected will be rescanned. The new image will replace the old one, index information and other metadata, like OCR texts remain in place, depending on the rescan they may need to be adjusted.
New Order
The current order will be closed and a new order in the selected order-type will be created.
The following two additional areas can also be found in the Order Bar:
Status
Displays the number of the image that is currently being viewed, as well as the total number of pages and the cumulative size of the scan order in kilobyte. The yellow box alongside shows the current pagination level i.e. page number of the active page. In case the file size of the open order is larger than the storage space of the hard disc, defined as a transfer target, the Status box will be highlighted in red and will display the storage place left, for example: D:\only 0 KB free
Job number, Indexes
Beneath the order-type, next to the yellow box the job number followed by the indexes can be found.
4.4.3 Ending the Order-Mode
To end an order, simply click the Stop button in the Order bar. The order is closed and the Order Window with the Order List will appear, alternatively you can end the order-mode by pressing the ESC key.
4.4.4 Drag & Drop
Images in the file formats TIFF and JPEG can be “dragged” from the Windows Explorer and “dropped” into the BCS-2® workspace via the mouse cursor. These images will then be integrated into the order by being placed behind the selected image. In the order-type Single the image will be opened and displayed.
Zip and PDF files may also be dragged and dropped into open orders, in both cases the files themselves are integrated into the order – not images. To display the contents of the ZIP or PDF file double click on the icon using the left mouse button, the files will then open as accustomed.
Caution: You need the sufficient security clearance for the specific Zip/PDF file before you drag & drop it into BCS-2® otherwise you will not be able to delete the order from the program.
ZIP files containing unloaded BCS-2® orders can also be imported into BCS-2® via the drag & drop feature, a confirmation request will appear before the order is unpacked. The procedure is similar to loading BCS-2® orders (see: Exporting and Importing Orders.) If you drag & drop them into open orders, BCS-2® will treat them like any other zip file, the order will not be imported.
4.5 Order Options and Options Dialog Window add section
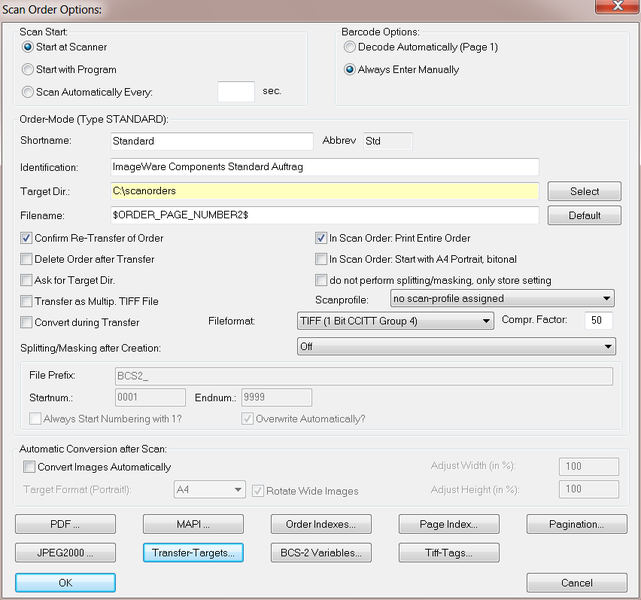
Before creating an order, the settings in the Order Options should be checked and, if necessary, adjusted. Select the desired order-type (e.g.: “Standard”) in the Order bar then open the menu point Options…. in the menu Order.
The Options Dialog Window will appear, showing all relevant settings for the selected order-type:
 Order Options
4.5.1 List of areas/ sections in the Options Dialog Window:
- Scan Start Options
- Barcode Options
- Order-Mode (General Settings of an order-type)
- Automatic conversion after Scan (Post-Scan Conversion)
4.5.2 Buttons in the Options Dialog:
- PDF … button opens a dialog window with settings for the conversion to a PDF file
- MAPI … button opens a dialog window in which the text, that is added to automatically generated e-mails when sending scans directly from BCS-2®, can be edited
- Order Indexes… button a dialog window with options for editing index keys is opened.
- Page Index… button opens a dialog window in which the options for additional page index keys for each scanned page can be defined
- JPEG 2000 button opens a dialog window with JPEG 2000 settings
- Transfer-Targets opens the dialog window for the transfer target configuration (Requirement BCS-2® ExportSuite)
- Pagination… button opens a dialog window with pagination options
- BCS-2® Variables… button, allows BCS-2®-Variables to be entered into an active input field (input fields turn yellow when variables are accessible) in the option dialog window. For more information about BCS-2® variables select the Documentation of System Variables option in the Help menu.
With the OK button the current settings are saved and the dialog window is closed. If you do not wish to save the changes you have made, click the Cancel button, the dialog window will close without saving the changes.
In the following section the individual Order Options will be explained in the sequence in which they are arranged in the dialog.
4.5.3 Scan Start Options
It is possible to choose between three scan start options, select the desired option by simply selecting the checkbox next to it.
Start at Scanner
Scans are started by pressing the appropriate button on the scanner (if the scanner is network-compatible and has a start button, for example Bookeye® family scanners with a network port). The selection of this option allows scan processes to be entirely operated from the scanner itself. The scan command is initiated at the scanner (for example via a foot pedal) where the documents are prepared, making this a very efficient way to work.
Start with Program
If this option is selected, scans are started by clicking the Scan button in the order bar or with the key combination “Ctrl + S”.
Scan Automatically Every _ sec.
The scan command is initiated in predefined intervals. The time interval between scans has to be entered into the input box (in seconds), enabling the start of an endless scan loop.
A separate window will show the countdown to the next scan. The automatic scan process can be stopped at any time by pressing the ESC key or clicking the Stop button in the order bar. This scan mode can for example be useful for scanning books; the scan operator only has to turn the pages of the book the scans are started automatically.
4.5.4 Order-Mode – General Settings
The general settings of an active order-type can be edited in the Order-Mode options area (the currently selected Order-Mode will be displayed in parentheses behind the “Order-Mode”, for example: “Type: STANDARD”)
Explanation of the Different Boxes:
- Dropdown list Scan profile pre- and individually defined scan profiles can be assigned to an order type.
- If the option do not perform splitting/masking, only store setting is activated the masking and splitting options are set and displayed in the order, but they are not carried out. The operation itself is performed during transfer; this is especially useful if two different sets of images of one order are needed.
- In Scan Order: Start with A4 Portrait the format of the first scan in a new order will be set to A4 and portrait format. This is ideal for order-types where the first page is for example a cover sheet with one or more barcodes.
- The option In Scan Order: Print Entire Order allows you to print an entire order from within the order itself. Alternatively it is possible to print specific pages or sections of an order, this selection can be specified in the print dialog window. If this option is left unchecked, pressing the print button will only print the image that is currently visible in the Image viewer.
- Dropdown box Splitting/Masking after creation offers various options for splitting or masking images, which will be performed before the image appears on the screen. Useful if only certain parts of images are needed.
- The option Convert during Transfer? determines if the images are converted to a certain format during transfer. You can choose between JPEG, PNG, GIF, BMP and TIFF formats, the compression or quality factor, depending on the format chosen, can also be defined.
- The selection of the checkbox Transfer as Multip. TIFF File will cause all images to be stored in a single TIFF file upon order transfer. This multi-page TIFF file is a multi-page document and will be saved in the target directory. No sub-folders are created for the individual scan orders. Caution: Orders that are to be stored as a multi-page TIFF file cannot exceed the maximum capacity of 2GB!
- If Ask for Target Dir. is activated, you will be asked to select the target directory before each order is transferred.
- Selecting the checkbox Delete Order after Transfer will cause the removal of the scan order from the scan order list after its transfer. The complete order with all its images is also deleted from the sub-folder scn_data in the BCS-2® directory, thereby saving hard drive space.
- If the checkbox Confirm Re-Transfer of Order is selected, a confirmation request will appear when an order that has already been transferred once is to be transferred again, requesting a confirmation of the order given.
- Filename: The name given to the image files during their transfer from BCS-2®, can be customized here.
- Target Dir.: The target directory into which the entire order will be transferred upon completion is defined here. For each order based on the Standard order-type a new sub-folder will, by default, be created, each containing the images of the specific order. This will not occur when using in the order-types Single and Simple.
- Identification: Displays the description of the currently selected order-type it may be altered here.
- Abbrev.: The abbreviation is intended for the internal labeling of an order in the order.dat file, which is created for each order.
- Shortname: Displays the short name of the currently selected order-type, it can also be modified here.
- The following section of the options dialog window is inactive by default, the input-boxes are only active in the order-modes Single and Simple:
- File Prefix: In this input box the file name under which scans are saved can be edited. The file name consists of a freely definable prefix and a number, which will increase by one for each scan.
- Startnum. and Endnum.: Start- and end-numbers that make up the suffix of the file name can be set here.
- Selecting the option Always Start Numbering with 1? starts the counter at one for the first scan of each order.
- Checking the option Overwrite Automatically? will cause old files to be replaced by new ones without a confirmation request.
4.5.5 Automatic Format Conversion after Scan
The settings to convert all images to a single format can be made in this area.
- With the activation of Convert Images Automatically all images created within an order will be converted automatically to the format selected in the target format box. This option is especially useful if orders are needed in a printable format.
- Following target formats are available: A2, A3, A4, A5, Legal, Letter, DLetter.
- The page orientation of the target format is always portrait.
- At the right end of the conversion options area are two boxes for adjusting the width and height of the images. This is useful to prevent document edges from disappearing when using printers without automatic scaling.
The scan will be converted without taking into consideration the size of the original document. Small original documents can be excessively enlarged and large original documents possibly become so small they become unreadable. Therefore results should be checked for their usability.
4.5.6 PDF Options (optional)
Prerequisite: BCS-2® PDF Module
The PDF options are only applicable if you have acquired the BCS-2® PDF Module
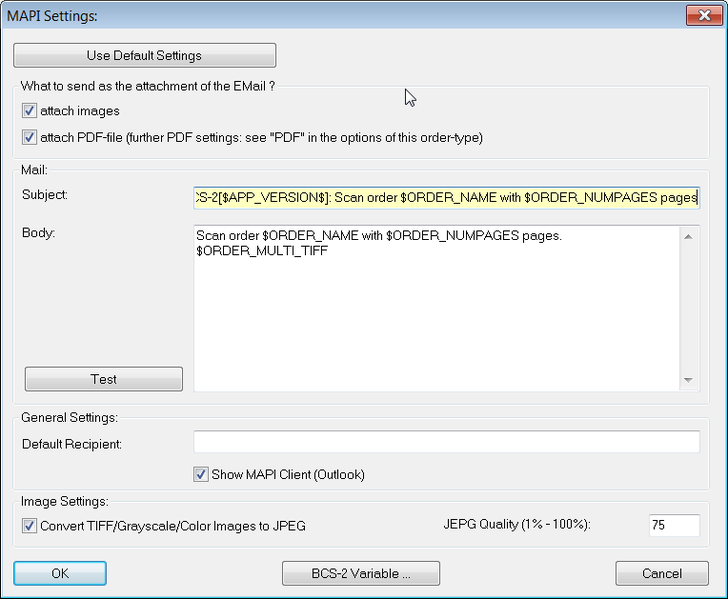
4.5.7 MAPI Settings
 Mapi Settings
Clicking on the button MAPI … in the order option window will open a dialog window with settings for sending e-mails via MAPI:
- Use Default Settings(button): Fills the input fields in the “Mail” area with standard values .
- What to send as the attachment of the Email?(What sort of an attachment is needed?): In this area it is possible to select if images and/or PDF files are to be attached to the Email. Prerequisite for PDF files is the PDF Module.
- Mail: In these input fields the Subject (topic) and Body (content) of the e-mails can be edited, it is possible to enter normal text as well as BCS-2® variables which are accessible via the BCS-2®-Variable … button. A new line can be inserted with the key combination CTRL+ENTER, ENTER will close the dialog window.
- Test(button): A preview of what the sent mail, without attachment, will look like is created.
- Default Recipient: When sending e-mails, the address in this input field will be used by default.
- Show MAPI Client (Outlook)(checkbox): If this option is activated the MAPI client (e.g. Thunderbird/Microsoft Outlook) will be started when sending emails via MAPI. Changes to the e-mail can be carried out in the Email program itself. If this option is not activated, the e-mail will be sent to the default recipient without opening the e-mail client; this can only work if a default recipient has been defined.
- Convert TIFF/Grayscale/Color Images to JPEG?(checkbox): Select this option to convert all TIFF gray scale and color images to a JPEG format. The box JPEG Quality determines the quality of the created JPEG (100 = best image quality = largest file).
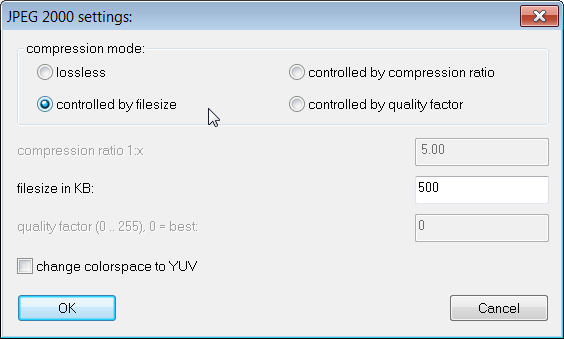
4.5.8 JPEG2000-Options
 JPEG 2000 Settings
Following compression modes can be selected for the output of files in JPEG 2000:
lossless compression
controlled by file size
If this option is chosen, the file size in KB can be set in the now active input box.
controlled by compression ratio
If this option is selected, the compression rate 1:x can be specified in the now active input field.
controlled by quality factor
Selecting this option enables you to specify the quality factor (0…255, 0 = best) in the now active input box. As indicated, the factor 0 enables the highest quality.
change color space to YUV
With this function the color space can be converted from the RGB color space to the YUV color space.
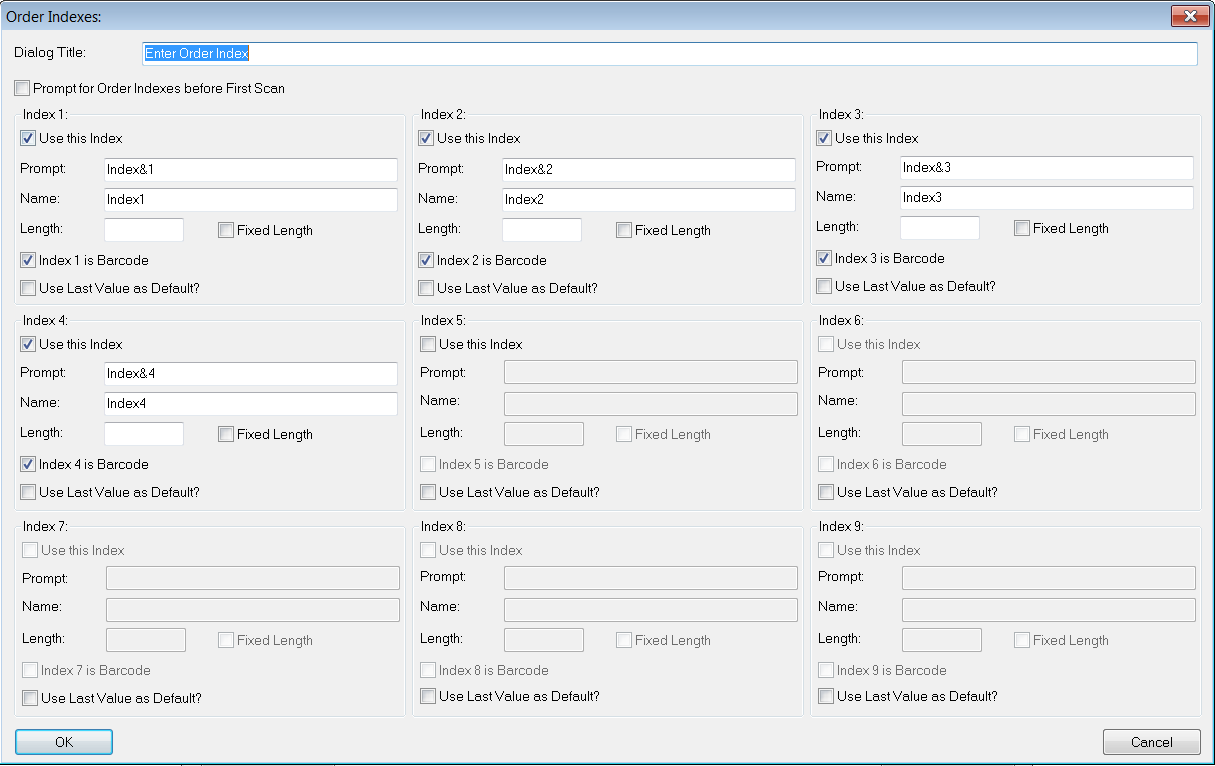
4.5.9 Order Indexes
 Order Indexes
Pressing the Order Indexes… button will cause the dialog window to open, in which the order indexes can be edited.
As many as 9 order indexes can be defined for the current Order-Type in the areas Index 1 to Index 9. For each index three input boxes need to be edited.
- Prompt: Enter the name for the index, which is to be seen in the order-index request, in case this box is to be accessible via shortcut, an & needs to be inserted before the characters in the input box.
- Name: The expression defined in this input box will be used during transfer of the order, it is saved in the order.dat file.
- Length: If the checkbox Fixed Length is activated, the length of the indexes is determined, otherwise the length remains unrestricted.
Additional Options:
- The checkboxes Index is Barcode defines which indexes will be recognized as a barcode.
- If the option Use Last Value as Default? is activated, the last index value will be used in a new order.
- The option Prompt for Order Indexes before First Scan? determines if the index request occurs before or after the first scan.
4.5.10 Page Index
Press the Page Index … button to open the dialog window for the page index settings.
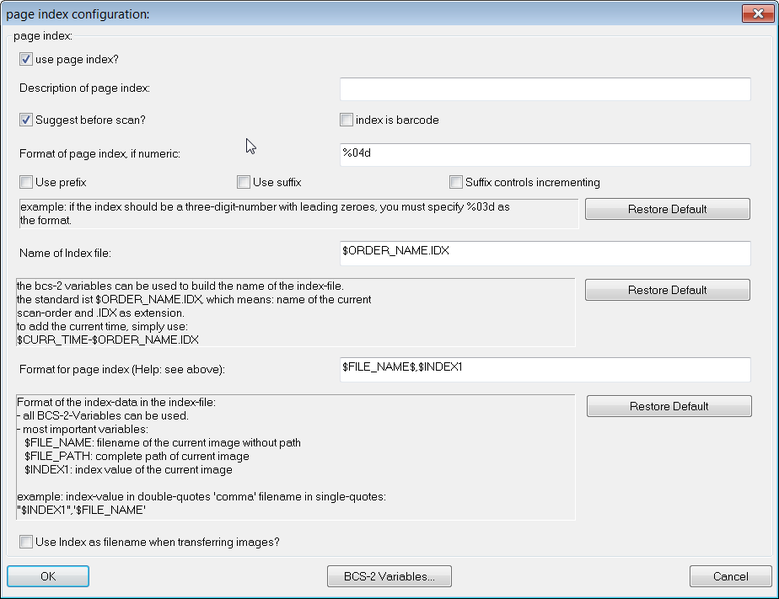 Page Index Configuration
Through the selection of the option Use Page Index? a query for an additional key to each scanned page is activated. The index can be compiled of up to three parts: prefix, the key itself (variable part, can be automatically incremented) and suffix.
The option Suffix controls incrementing will have the following effect: If the option is activated, filling of the suffix box (which was previously empty) will deactivate the automatic incrementation, and decrement the already increased page number.
When creating a new order an additional window with the definition of the additional key will henceforth be seen in the title bar, recommending the page index for the next page, if the option Suggest before scan? was activated. The window contains the option Increase Automatically when activated the counter automatically jumps to the next number after a page has been scanned. The index can be manually increased or decreased by pressing the + and – buttons. If prefix and/ or suffix of the page index have been activated, additional input boxes will appear in front of and/or behind the input box of the key itself (both empty in the screenshot above).
When exiting an order and before transfer, BCS-2® checks if all pages have a non-empty page index and if any indexes have been distributed twice. After the control all pages lacking an index or with index duplicates are listed and displayed, orders with incorrect page indexes are not transferred.
For the index file a standard name can be used consisting of the BCS-2® order name and the ending .IDX. The name can always be reset to the standard name by clicking the Restore Standard button. If desired an individual name for the file can also be created by using the BCS-2® variables (BCS-2 Variables… button).
It is also possible to define the format of the index data for the index key, within the index file or to use a standard setting. Activate Use Index as the filename when transferring the images? if the index keys are to be used as a file names when transferring the images.
4.5.11 Pagination
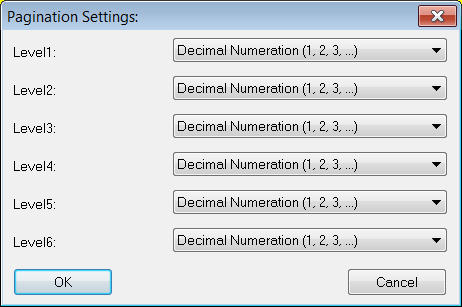 Pagination Settings
In the pagination dialog window which can be opened via the button Pagination… the valid page structure of the current order and order type can be set. (see: Pagination functions).
The pagination (structuring) of an order can be used for example during the scanning of a book to illustrate its chapter and subchapter structure in the order. Hence a scan order can be, if required, structured in accordance with its submittal.
For each pagination level a numeration format can be selected, for example decimal numeration, roman numeration, capital letters, etc.
Pages can be paginated during or subsequent to a scan process. During a scan process the pagination level of a page can be increased or decreased via the + and – keys. The current structure can be displayed in a separate window, which can be opened by selecting the Pagination: Show Current Structure… option in the Order menu. The pagination levels can also be changed in this window, by selecting the appropriate images and using the + and – keys.
The pagination function can also be accessed via the Order menu.
4.5.12 TIFF Tags
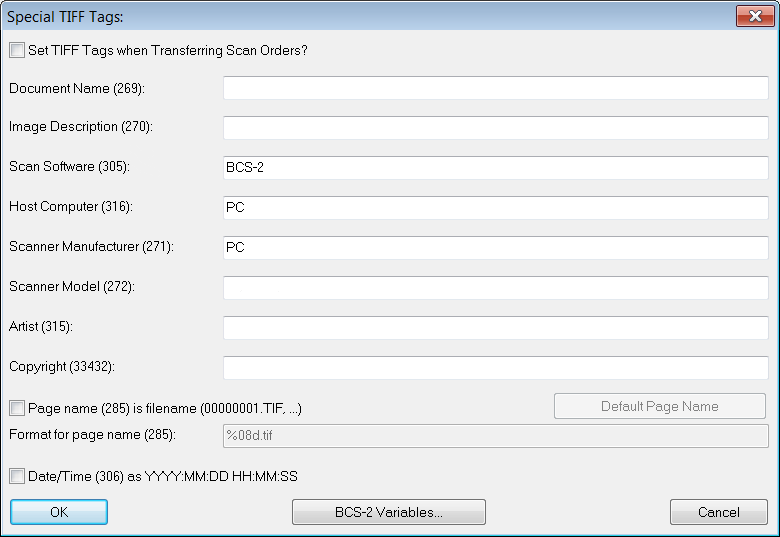 TIFF Tags
It is possible to define or edit TIFF tags in the corresponding dialog window, which can be opened via the TIFF-Tags… button. Activate Set TIFF Tags when transferring scan orders, if the information defined in this dialog window is to be attached to each TIFF image that is transferred. Following information can be added to each image:
- Document Name
- Image Description
- Scan Software
- Host Computer
- Scanner Manufacturer
- Scanner Model
- Artist
- Copyright
It is possible to enter normal text as well as BCS-2® variables which are accessible via the BCS-2®-Variable … button. If the page name of the TIFF-images is to differ from the other images activate the Pagename is filename and define the name in the now active input box. Select Date/Time if the date and time of the transfer is to be included in the TIFF Tags.
4.6 Order Window and Order List add section
The Order Window displaying the Order List can be accessed via the menu item Select… in the Order menu or by ending the Order-Mode. Here scan orders can be administrated and processed.
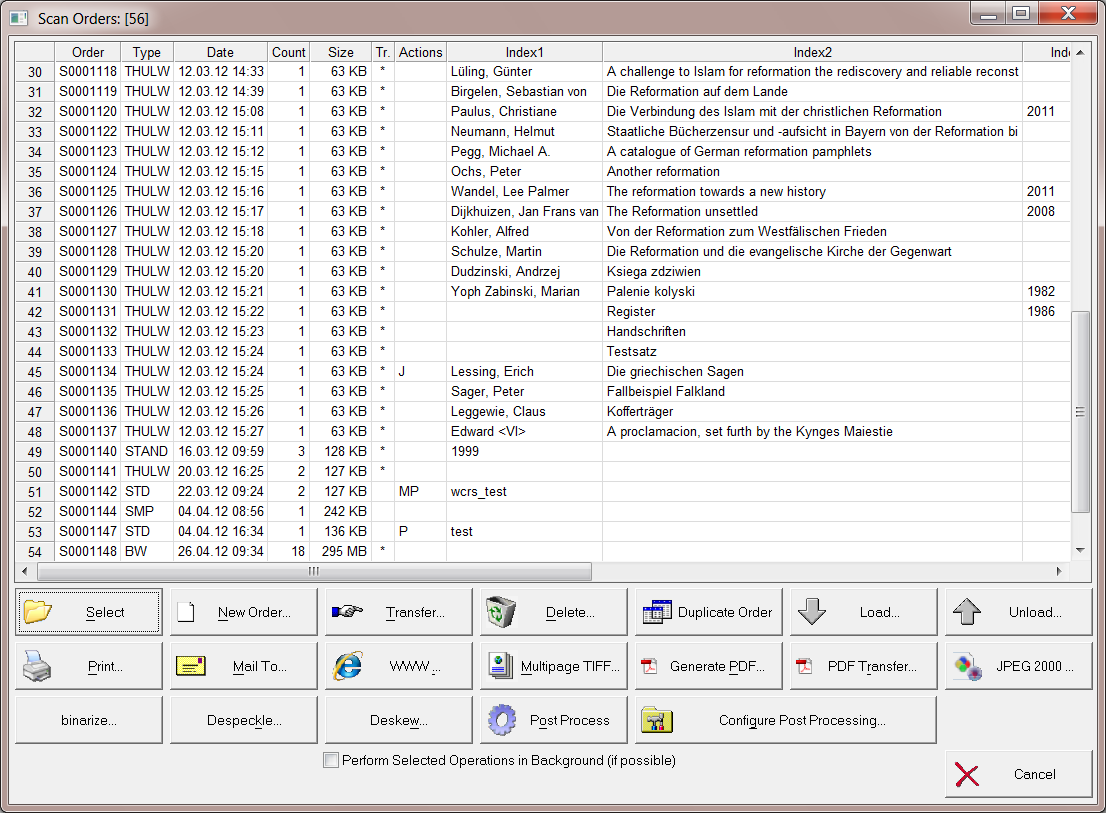 Scan Orders
The most recently created order will appear at the bottom of the list. The position number of the last order opened during a BCS-2® session is highlighted in green. All orders can be processed, respectively administrated from here.
Following information is displayed for each order:
Order
Order name or job number
Type
Order-Type
Date
Date the order was created
Count
Number of images within the order
Size
Size of the order in kilobyte
Tr.
A marker will appear in this column after orders have been transferred (*).
Actions
All actions that have taken place for an order are recorded here:
- Order printed: H (for Hardcopy)
- PDF generated from order: P
- Oder send via mail: E (for Email)
- Order stored as a MTIFF: M
- Order post processed: O
- Order transferred via WWW-Template: W
- Index 1,2,3… If applicable the used indexes are displayed.
The orders can be sorted by the desired column by double-clicking on the column title. For example, all orders that still need to be transferred can be listed beneath each other. Double-clicking into the upper left hand corner selects all orders, which can also be done by pressing the key combination CTRL+SHIFT+END. This way all orders can be edited (e.g. deleted) at the same time, even if the list is very long. The column width can be adjusted with the mouse.
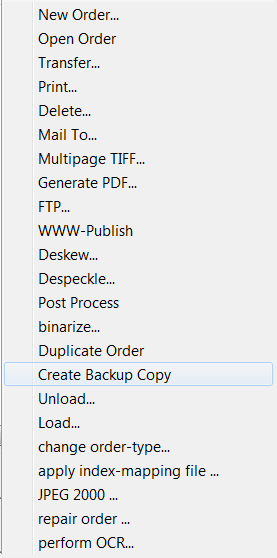
4.6.1 Order Context Menu
The order menu – a context menu – is opened with a right-click within the order list. From this menu all options that can also be started via buttons can be accessed.
 Order Context Menu
The following additional functions are only accessible via the Order context menu:
4.6.1.1 Create Backup Copy
This option will, after confirming the appearing query, create a backup copy of each image in an order, thereby enabling the restoration of each image after a process has been carried out.
4.6.1.2 Change Order Type
It is possible to change the order-type of existing orders, with the exception of order-types that are linked to specific systems, all order-types based on the order-type Standard can be exchanged. Choose the desired order/s from the order list and select Change Order Type in the Order context menu, then select the desired new order-type from the appearing dropdown list. After confirming the appearing query, BCS-2® compares the previous with the selected order-type and informs you about the Index Mapping options. The default mapping is 1:1, but it is possible to specify a mapping of your own. The dialog window in which the “Index Mapping” can be edited opens after the information window was closed.
4.6.1.3 perform OCR
(Requirement: BCS-2® OCR Module) Select the desired orders and activate the text recognition “perform OCR” via the Order context menu, the post processing of the selected orders with predefined OCR settings will then take place.
4.6.1.4 apply index-mapping file…
If you wish to change order indexes or the sequence of the order indexes of several orders without having to adapt each order index individually it is possible to create a csv-file and to import it via this function.
4.6.1.5 Repair Order…
The individual functions of all other options will be explained in more detail in the following sections.
4.6.1.6 Selecting Orders for processing
Select the order you wish to process from the order list by simply clicking on the appropriate order with the left mouse button, to select multiple orders click on the first order and then drag to the last order or use the Shift key and click on the desired orders. The selected order or orders are highlighted in blue.
4.6.1.7 Deleting Orders
Press the Delete button to delete the selected orders. The orders will be deleted after the appearing confirmation request was confirmed with Yes.
Creating a Multi-Page TIFF File
By pressing the Multi-Page TIFF… button you can create a multi-page TIFF file from the currently selected order. A dialog window will open asking for the name and directory for the multi-page TIFF file. After the message is confirmed with OK the file is created in the target location.Caution: do not attempt to create a multi-page TIFF file from orders that exceed the 2GB limit.
4.6.1.8 Creating a PDF File (optional)
Requirement: BCS-2® PDF Module
By pressing the Generate PDF… button a PDF file from the currently selected order will be created and directly transferred to the target directory
4.6.1.9 Transferring PDF Files from their Target Directory
Opens the dialog window Working with PDF files via the PDF Transfer… button. The dialog window will display all PDF files in the PDF target directory of the currently selected order-type, which can be sent via e-mail, opened or deleted by selecting the desired file and pressing the appropriate button.
4.6.1.10 Publishing Orders Online via BCS-2Prerequisite Web-Publisher
Prerequisite: BCS-2® Web-Publisher
To publish an order online, select the desired order from the order list and click the “WWW …” button. The order will be transferred in accordance to the predefined settings in the BCS-2® Web-Publisher.
4.6.1.11 Transferring Orders
Select the desired order or orders from the order list. Now press the Transfer… button to transfer all selected orders to the target directory defined in the order options. If the option Delete Order after Transfer is activated within the order options, the transferred orders will be deleted from the scan-data file and the order list. The scans of the order are transferred to the target directory together with the order.dat file (which describes the order) but without thumbnails. No order.dat file is created for the transfer of orders of the order-type Simple.
4.6.1.12 Mailing Orders
To send selected orders via email, press the Mail To… button. A message will appear asking if the order should first be saved as a multi-page TIFF file. The confirmation with yes will lead to the creation of a multi-page TIFF file with the advantage that only one file needs to be attached to the mail. Declining the query will cause the attachment of the single images of an order to the email. Once a selection has been made, the order, together with an automated mail containing all relevant information concerning the order (including indexes), will be transferred via MAPI to your e-mail software.
4.6.1.13 Despeckle Entire Orders
Speckle is the “noise” within the image of a scanned document, random single pixels (speckles) act as a fog layer thereby decreasing the image quality. “Despeckle” is the name of the automatic method for removing speckles. By pressing the Despeckle button the noise from all images within an order is removed. Please note: In case of insufficient quality of the submittal, parts of the scan (e.g. text) can be removed unintentionally by a despeckle.
4.6.1.14 Deskew Entire Orders
The automatic method of straightening skewed scanned images is called “Deskew”. Pressing the Deskew button in the order list will cause all images within the selected order(s) to be optimally i.e. horizontally aligned.
4.6.1.15 JPEG 2000
To convert the file format of images of an order to JPEG 2000, select the desired orders from the order list and press the JPEG 2000 button. The order itself will not be converted; instead BCS-2® creates a folder in accordance with the transfer target defined in the order options and converts the images during their transfer.
4.6.1.16 Binarize
Press the Binarize button to turn all gray scale and color images of an order into black and white images. The binarization will take place after the confirmation request was confirmed with Yes, in accordance to the predefined Binarization settings.
4.6.1.17 Duplicating Orders
Via the button Duplicate Order a selected order or orders can be duplicated. Duplicated orders are treated by BCS-2® like new orders, the order number will be the continuation of the latest order number given and the orders are automatically attached to the end of the order list. This option is useful if you wish to conduct different processing options for one and the same order, or if you wish to keep the original raw scan.
4.6.1.18 Exporting and Importing Orders
Scan orders can be exchanged between different BCS-2® systems. The two operations for exchanging orders are located in the order window with the order list:
4.6.1.19 Unload…
This button (or the corresponding point in the order context menu) unloads one or more BCS-2® orders as a ZIP file. The ZIP file is recognizable as a BCS-2®-order-export file through its name and contents. The name consists of the first four BCS-2 license numbers from the BCS-2 from which it was unloaded, followed by the original order number. The file itself contains the images, including the corresponding thumbnails, three XML-Files (order-head, order-page, order-type description), the ORDER file (DAT-file) and a file named SIGNATURE. In the SIGNATURE- file the license number and version of the exporting BCS-2® program is saved as well as the information that it is a BCS-2®-order-export file. This signature file allows the BCS-2® software to differentiate between a BCS-2®-order-export file and a normal ZIP file.
Please note: Orders with a file size larger than 2GB cannot be unloaded.
4.6.1.20 Load…
This button is used to import previously exported (unloaded) orders into the BCS-2® software. A file browser will appear, requesting the selection of the ZIP-files for the scan-order import. Besides verifying if the selected ZIP-file is a proper BCS-2®-order-export file (see above), BCS-2® will control the order-type of the imported order and will then import the orders contained in the file. In case the order-type doesn´t exist in the current BCS-2® a notification will appear, stating the name of the order-type, the number of order indexes and the enquiry if the order-type should be created. The import of the orders will begin if the query is confirmed with Yes. After a successful import BCS-2® will display the result of the import. The list will state the new order number, the previous number of the order, the order-type and the number of pages in the order.
4.6.2 Printing Orders
Press the Print… button to print all selected orders. Printed orders are marked in the Pr. Column.