
- 10. Scanner Menu

- 10.1 Selecting a Scanner
- 10.2 Scan Mode
- 10.3 Scanning from the Scanner Menu
- 10.4 Selecting Color Depth
- 10.5 at the scanner: automatic…
- 10.6 Document mode
- 10.7 Scan Front and Backside (ISIS, HPSC)
- 10.8 Settings for the book fold correction
- 10.9 Thumb Removal Settings
- 10.10 Improved Bitonal Interpolation
- 10.11 Define Userformat
- 10.12 Scan profile administration
- 10.13 Microfilm Settings (optional)
- 10.1 Selecting a Scanner
10. Scanner Menuadd chapter
10.1 Selecting a Scanneradd section
Caution:The scan mode has to be selected before a scanner can be chosen.
A scanner can be quickly and easily selected via the Select a Scanner… option in the Scanner menu. If multiple suitable scanners are installed on the system the desired scanner can be selected from the list, respectively network scanners need to be defined by entering the name and IP address before they are listed.
Depending on the scan mode selected, BCS-2® will load the necessary drivers and search for scanners. After a short while a window with a list of available scanners will appear. Select the desired scanner with a left click, and confirm your selection with the OK button.
10.2 Scan Modeadd section
BCS-2® offers the possibility of connecting scanners via HiScan port, Network, TWAIN, or the generic HPSC-interface by ImageWare. To do so, select and activate the appropriate mode in the Scanner menu with a left click.
To connect scanners via HiScan, TWAIN or HPSC it is necessary to first install the respective scanner driver.
If you select the Use TWAIN/ISIS Interface menu point, you can scan from the interface of the scanner or scanner driver and adjust scanner specific properties within BCS-2®.
The option TWAIN: Always Send Settings to Scanner will make BCS-2® send the set properties to the scanner before each scan. This may be necessary for some TWAIN scanners.
10.2.1 Settings for Bookeye® Family Scanners
If the network mode is active, the option Network Scanner Settings… will open a window with special settings for Bookeye® family scanners. Among other settings you can determine: file format (JPEG or TIFF), document mode (flat, folder, book), page splitting, the search area for auto-format and the gamma value. This window also displays the firmware version and serial number of the network-connected Bookeye® scanner.
The contents of the dialog depend on the Bookeye Scanner connected to BCS-2®, some of the options are only accessible for certain Bookeye models. In any case it is recommendable to activate the Option High Quality Mode via checkbox – if available.
In the Auto-Exposure area the Auto-Exposure mode of network connected Bookeye® family scanners can be activated. Two operating modes are supported: The first turns all pixels below the threshold value black (Draw to Black), while the second (Recompute in Image) examines and adjusts the image.
Pressing the Autofocus Control … button opens the Autofocus Settings:
In the Autofocus Mode you can choose one of three settings:
- Autofocus always on
- Fix autofocus on baseplate: This setting can be useful when using a book holder.
- dynamic Autofocus: The checkbox activates the dynamic autofocus. The dynamic autofocus makes sure that the autofocus-function isn´t carried out before each scan, thereby greatly accelerating the work while scanning. Function details of the dynamic autofocus can be adjusted in the further settings:
- Timeout in Seconds for next Autofocus: Here you can define after which period of time without a scan the autofocus function is performed again.
- Number of scans with same focus: The number of scans performed with the same focus can be set here.
The menu point Network Scanner Web-Interface… in the Scanner menu opens the web interface of a scanner, where additional settings can be adjusted.
10.3 Scanning from the Scanner Menuadd section
You can start scans from within a scan order by selecting the Scan option in the Scanner menu, or alternatively by pressing the key combination CTRL+S. Activating the menu point Acoustic Signal before Scan will ensure, that the scan readiness is indicated with an acoustic signal.
10.4 Selecting Color Depthadd section
In the Color Depth menu point it is possible to choose if you want to scan in black and white (bitonal), in grayscale (4/8 Bit), in the photo mode (see below) or in color. The possible settings depend on the scanner being used. The Improved Bitonal Interpolation is only relevant scanners of the type Bookeye® 1 and only accessible directly in the “Scanner” menu.
The buttons black and white, grayscale and color can also be found in the tool bar.
10.4.1 Photo Mode
Photo Mode is a special black and white mode for certain Bookeye® family scanners. Scanning occurs bitonal, but the quality of the scanned image is “improved” through error diffusion (dithering), avoiding hard transitions between light and soft areas.
10.5 at the scanner: automatic…add section
With this option it is possible to define that certain operations can be performed directly from the scanner, if the scanner appropriately equipped.
Align (Deskew)/ optimal scan
If the option is active the scans will be aligned automatically (for Zeutschel scanner)
Detect borders
Automatic border detection for the scan is performed (for Zeutschel scanner)
Rotate 90°
(for Zeutschel scanner)
Rotate 180°
(for Zeutschel scanner)
Activate thumb-removal
Performs the automatic thumb removal supported by the BookEye 4
Automatic brightness/optimize background
(for Zeutschel scanner)
Automatically scan when glass plate is closed
Available for Zeutschel scanners with a glass plate (e.g. OS12000)
Automatically open glass plate after scan
Available for Zeutschel scanners with a glass plate (e.g. OS12000)
10.6 Document modeadd section
10.6.1 Mode: FLAT: (flat documents)
10.6.2 Book fold correction(Bookeye®-Scanners)
By selecting the Bookfold Correction option in the Scanner (or the corresponding Tool bar button) menu the automatic book fold correction for Bookeye® family scanners can be activated.
Detailed settings for the book fold correction can be made by selecing the Bookfold Correction Settings… option in the Scanner menu.
10.6.3 Mode:Folder
10.6.4 Mode:fixed focus
10.6.5 Mode:glass plate
10.6.6 Mode:Automatic (BE4)
10.6.7 Mode:V-Mode (BE4)
10.7 Scan Front and Backside (ISIS, HPSC)add section
The Scan Front- and Back-Side option in the Scanner menu is only available for scanners connected via HPSC which are equipped with an automatic and duplex capable document feeder. If this option is active, both the front- and back-page of documents will be scanned.
10.8 Settings for the book fold correctionadd section
10.9 Thumb Removal Settingsadd section
10.10 Improved Bitonal Interpolationadd section
10.11 Define Userformatadd section
The Define Userformat… option allows the scanning of only a predefined section of the scan area. This function is only available with Bookeye® family scanners and some ISIS scanners. If this function is active it will firstly initiate a scan of the entire scan area, thereafter the user format section can be defined with the mouse.
To be able to scan the defined area, the option User defined must be selected from the dropdown list Format in the Order Bar (or at the scanner in case manual/panel is activated).
10.11.1 set user defined resolution
10.11.2 Microfilm
10.11.3 Book cradle settings
10.12 Scan profile administrationadd section
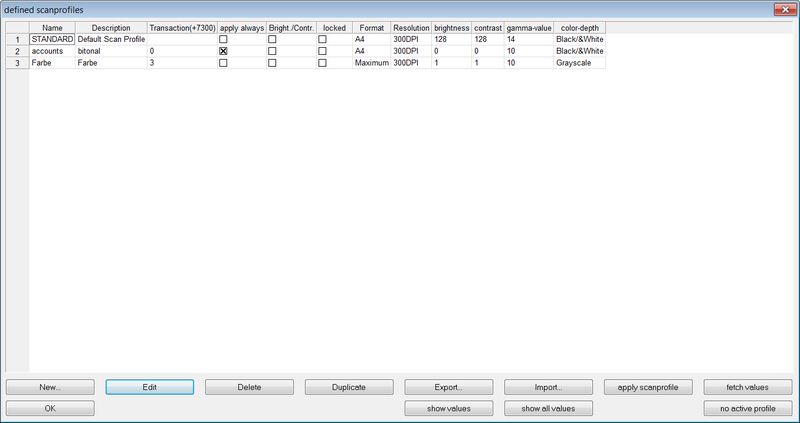
Scan profiles which can be assigned to an order-type in the Order Options can be individually defined in the Scan Profile Administration in the Scanner menu. Select the Scan Profile Administration to open the dialog window in which the list of predefined scan profiles is displayed and new profiles can be created.
Following information is displayed for each profile:
Name
Name of the scan profile
Description
Short description of the profile
Transaction (+7300)
Transaction number of the scan profile
Apply always
If activated, the selected profile is applied before each scan.
Brightness/Contrast
If activated the brightness and contrast can be modified before each scan – only selectable if the profile is used before each scan was activated in the base settings.
Locked
The profile is locked and cannot be deleted or changed.
Format
Shows format/size of the scan region.
Resolution
Value of the resolution is displayed.
Brightness
Brightness value is displayed.
Contrast
Contrast value is displayed.
Gamma-Value
Gamma value is displayed.
Color depth
Selected color depth (black & white, gray scale or color) is displayed.
To receive more information about a specific scan profile, respectively get a detailed list of all the settings of the selected profile, press the show values button. A list with containing the settings of all scan profiles currently in the list can be viewed by selecting the show all values button.
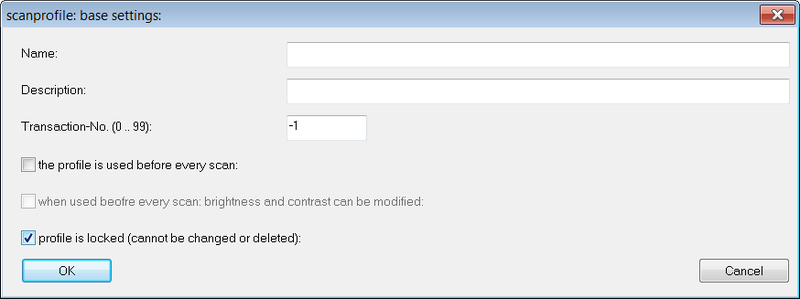
10.12.1 Creating a new scan profile
To create a new scan-profile press the button New or duplicate an existing profile via the Duplicate button and edit the duplicate.
The dialog window scan profile, base settings will appear in which following base settings can be defined.
Name
Name of the profile, which will be displayed in the title bar of the Image Viewer when a profile is activated.
Description
A short description of the profile may be entered here.
Transaction number (0…99)
enter a number between 0 and 99, thereby creating a transaction code which may then be used as a keyboard shortcut.
the profile is used before each scan
Select this option to activate the profile before each scan.
When used before each scan, brightness and contrast can be modified
Activate this option to be able to adjust brightness and contrast (only accessible if “the profile is used before each scan” was activated).
profile is locked (cannot be change or deleted)
If this option is selected it will not be possible to change or delete the scan profile.
Confirm the base settings by ending the dialog menu with OK, the new scan profile will now appear at the bottom of the list. The scan settings (format, color depth, resolution, etc.) will be corresponding to the BCS-2® settings active at the time of the scan profile creation.
10.12.2 Editing a scan profile
To edit a scan profile, select the desired profile from the list and press the Edit button, the dialog window with the base settings will appear and may then be adjusted.
To change the scan settings select the appropriate scan profile and press the fetch values button, the present scan settings will be overwritten with the currently active scanner settings, if the appearing query is confirmed with Yes.
10.12.3 Deleting scan profiles
Delete a scan profile from the list, by selecting the profile and pressing the Delete button, the profile will be deleted after the confirmation of the appearing query.
10.12.4 Duplicating scan profiles
To duplicate scan profiles select the specific profile from the list and press the Duplicate button. Duplicated orders are treated like new orders and will also be attached to the end of the scan profile list. To adjust duplicated profiles use the edit button (see above).
10.12.5 Exporting and importing scan profiles
It is possible to import and export scan profiles, which is very useful if you are working with multiple BCS-2®s on one or more systems or are about to install a new BCS-2® and you do not want to start from the beginning.
Export
The scan profile is exported as an XML- file, which is recognizable for BCS-2® through its contents. Apart from the scan settings the BCS-2® license number is saved in this file. Pressing the button will cause a file browser to appear requesting for information about the place where the file is to be saved.
Import
This button is used to import previously exported scan profiles into BCS-2®. A file browser will appear requesting the selection of the XML-file for the scan-profile import.
10.12.6 Activating an deactivating scan profiles
Scan profiles can be activated by selecting a profile from the defined scan profiles list and pressing the apply scan profile button. The selected profile will then be applied to each new order without an assigned scan-profile. Order-types, respectively orders to which a scan-profile was assigned in theOrder Options will not be affected. If a scan profile was activated over the Scan Profile Administration, the name of the profile will appear in the title bar of the ImageViewer.
To activate scan profiles for certain Order Types select the desired scan profile from the dropdown box in the Order Options in the Order menu. To deactivate a scan profile, without selecting a new one, press the no active profile button, the scan profile will be deactivated after the notification was confirmed with Yes.
10.13 Microfilm Settings (optional)add section
Requirement: corresponding BCS-2® modules
The Microfilm Settings option in the Scanner menu opens a window with multiple settings for microfilm scanners.