
1. Basicadd chapter
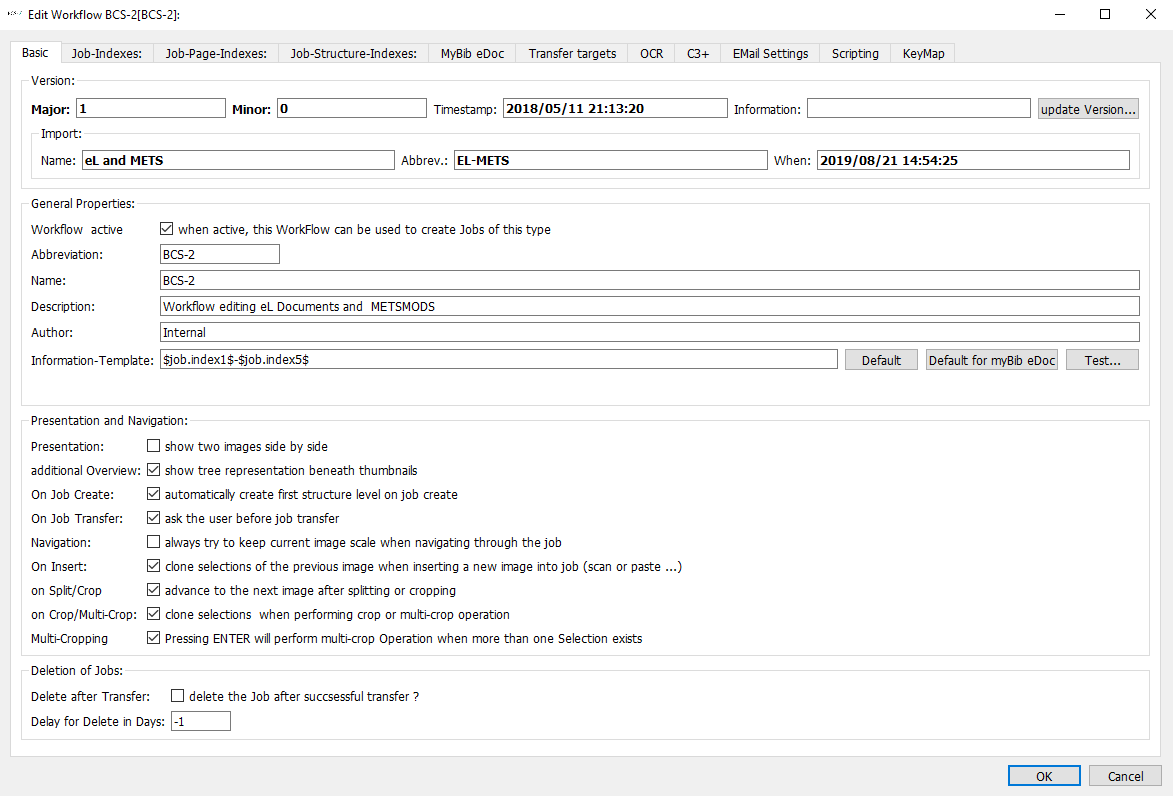
In addition to the general workflow settings, the navigation, display, masking and deletion options for the workflow jobs are stored in the Basis tab. The options that can be activated under Display and Navigation significantly influence the appearance and mode of operation within the application and, above all, the behavior of the masks/area and division functions.
1.1 Versionadd section
In the Version area, the system displays the current version of the workflow, the time of creation, and any information about the version. If a workflow can and should be changed, the version should be incremented. Click the Count up version button to call the dialog for changing the version of the workflow.
The information entered is then displayed in the workflow.
After importing a workflow, the original name of the imported workflow, the abbreviation, import date and time are also displayed in this area.

1.2 General Settingsadd section
Workflow is active: If active, then this workflow can be used to create new jobs: If the workflow is active it can be selected by the user via the drop-down list to create new jobs.
Abbreviation: Abbreviation of the workflow.
Name: Name of the workflow
Description: A short workflow description can be entered here.
Author: Author of the workflow
Information template:
The information template determines which job information is displayed in the Information column of the job list.
1.3 Display and Navigationadd section
The following options can be used to change the default BCS-2® view, navigation, selection and mask settings for the workflow. The settings have a significant influence on the post-processing workflow.
Display:
Two images next to each other: For all jobs in this workflow, two images are displayed next to each other in the preview bar and viewer after a job has been opened. These are always the two consecutive images.
Additional overview:
Show tree view below the thumbnails: The thumbnail bar is divided into two parts, in the upper part the preview images of the images are displayed, in the lower part the images are listed in a tree structure. Navigation and selection of an image can be done via both display modes.
When creating a job:
Create the first structure node automatically: This function can be used in the context of structuring within a structure tree. The first structure node is automatically created for each new job. All other structure nodes can then be added manually (information: see Indexing Manual ( in progress) ).
Transfer on job:
- Ask the user beforehand whether the job(s) should be transferred: The user must confirm the transfer again after triggering it.
Navigation:
- Keep the current type of display when navigating:
The last selected view setting is also retained when navigating to the next image, so that it is displayed with the same view settings.
When inserting into the job:
- Apply selections from the previous page to the page:
Created masks, areas or dividing lines are automatically adopted for the next image when scanning or importing.
This action should always be active in standard workflows.
For page splitting/masking:
- Automatically go to the next image after page splitting or masking: After the action Confirm page splitting or Masking (also applies to areas) has been carried out by clicking Confirm action or Enter, the system automatically navigates to the following image.
When masking:
- Copy selections for the next page: After the action Confirm page splitting or Masking (also applies to areas) has been carried out by choosing Confirm action or Enter, the splitting line/areas are transferred to the next image.
Inserting Areas in Jobs
- Use the ENTER key to transfer the existing areas to the job as images. If this option is activated, the Areas function can be used to insert marked areas of an image into the job as new images by pressing the ENTER key. If this option is deactivated, images can only be cut using the masks.
This option is set as active by default, in the context of C-3 Plus workflows and other workflows where areas are used for indexing, the option should be deactivated.
1.4 Delet Jobsadd section
Delete job after successful transfer?
If this option is active, the jobs are automatically deleted either directly after the successful transfer or after a certain number of days (waiting time) after the successful transfer.
Waiting time for deletion in days: The number of days after which the jobs are to be deleted automatically is entered here if automatic deletion has been activated. 0 means that the jobs are deleted immediately after successful transfer.