
4. Transfer Target Listadd chapter
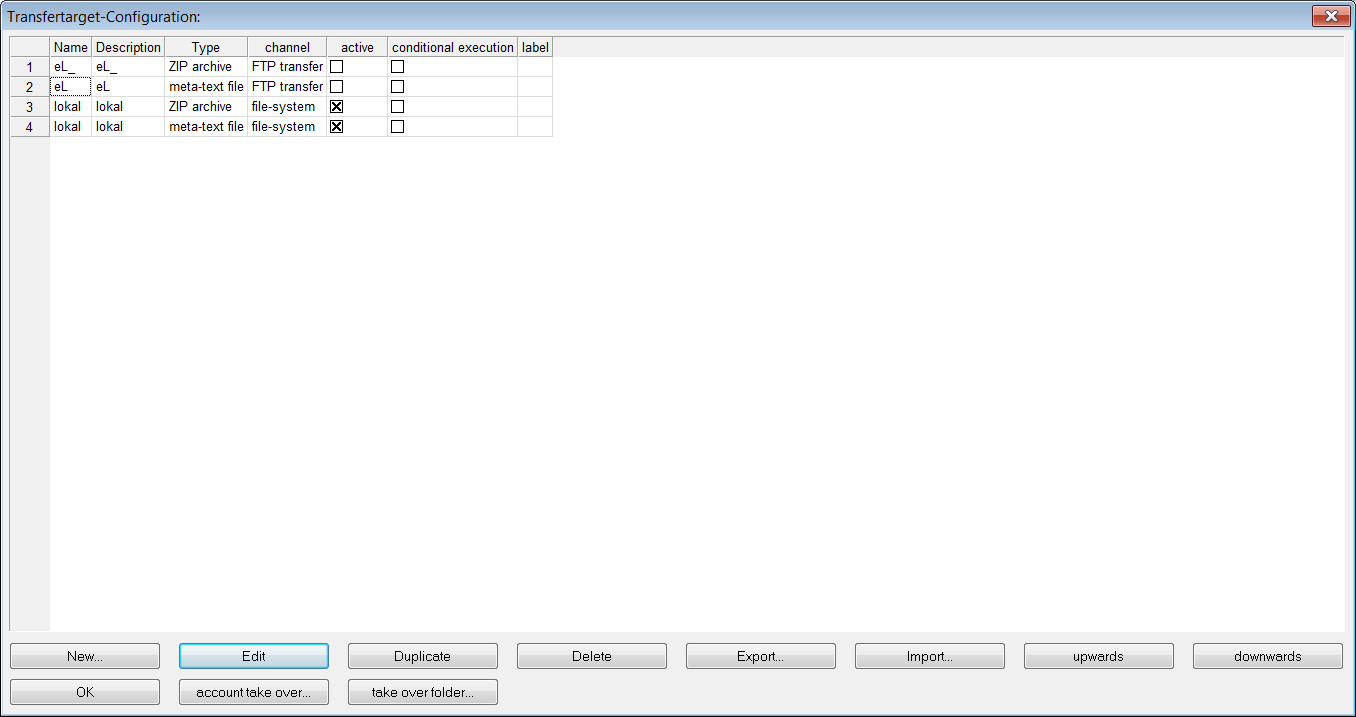
In this dialog you can create new or import transfer targets. Existing targets can be edited, duplicated, deleted, exported and scrolled up- or downwards.
The target folder of a selected transfer target can be applied to all other existing targets via the button take over folder, in case different types of files (images, metadata etc.) of one order are to be transferred to the same folder.
Via the button account take over FTP/ SFTP user data of a transfer target with FTP/SFTP transfer can be applied to all other transfer targets with FPT/SFTP transfer in the list.
The sequence of the transfer targets defines the sequence in which BCS-2® will process the order during transfer.
4.1 Creating a new Transfer Targetadd section
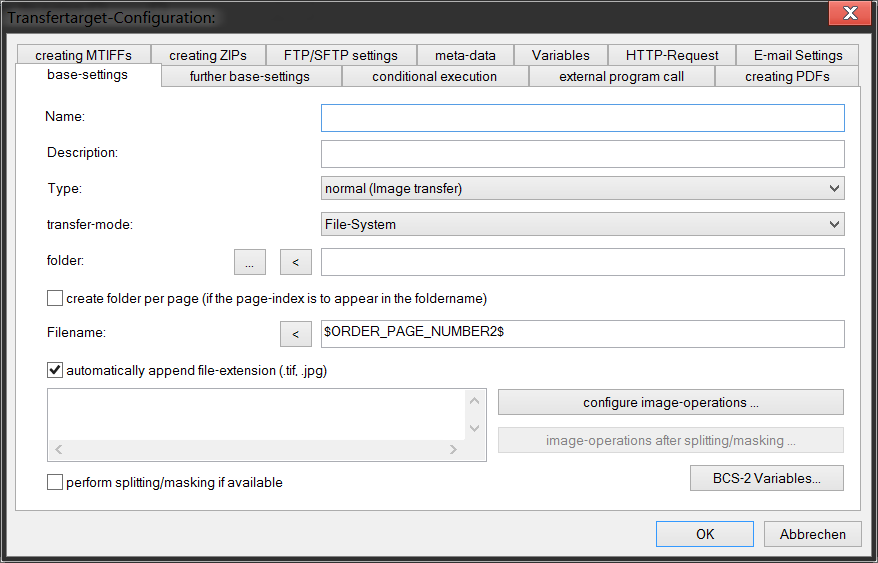
After pressing the button New a transfer target can be configured in the appearing dialog.
Amongst others following options are configured in the base settings:
- The transfer-target type, meaning image transfer, PDF creation, Multi-Page-TIFF creation, ZIP-archive creation, external program call, unloading of the order defining variables or sending a HTTP-request.
- The transfer channel, hence the transfer in the file system, FTP/ SFTP transfer.
Furthermore image operations such as deskew or format conversions can be defined and conditions specified which have to be fulfilled before the transfer of the order is carried out, for example a specific index value, etc.
For each transfer target a name and a description has to be entered.
Then the selection of the transfer-type and the transfer channel takes place. Depending on the transfer-type selected the further settings, for example PDF or FTP settings can be made in the corresponding tabs. The possible and necessary settings are explained in the next sections.
4.2 Transfer Target Typesadd section
4.2.1 Normal (transfer image)
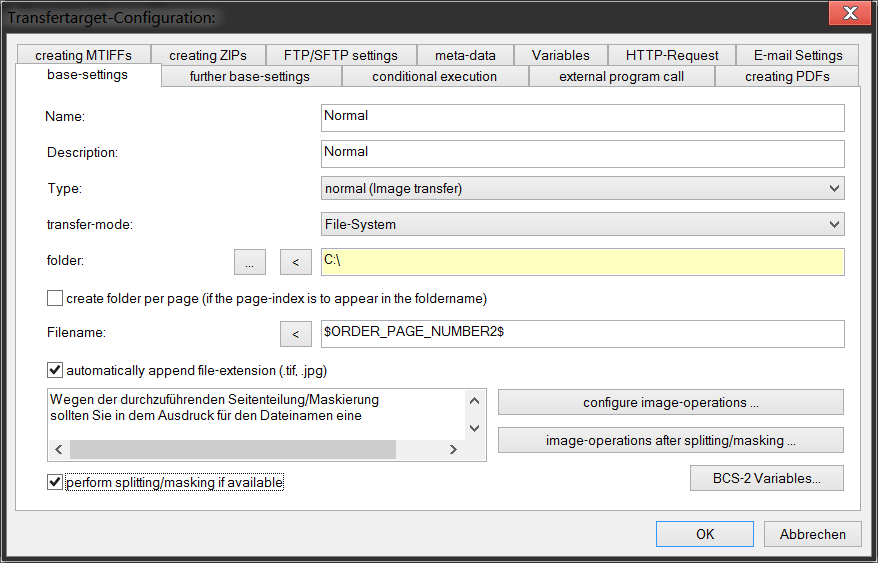
In this transfer target type the images of the current order are transferred to the defined folder via the selected transfer mode. For the filename the value ORDER_PAGE_NUMBER2, meaning the number of the current page in the order with leading zeros, is automatically suggested.
ORDER_PAGE_NUMBER2 belongs to the BCS-2® variables. In general, the suggested values in the input fields can be replaced or expanded through own expressions. A shortcut to the BCS-2® variables is possible via the BCS-2 ® Variables… button. The desired variable can then be selected in the appearing dialog window and may be inserted into the active input field by pressing the button Apply. Furthermore you will find a short description to each variable in the selection window. For further information see the documentation of the BCS-2® Variables
If necessary, it is possible to create a subfolder for each image, for all transfer target types which steer the transfer of images and metadata into folders, by activating create folder per page (if page index is to appear in the folder name).
4.2.2 Creating a PDF
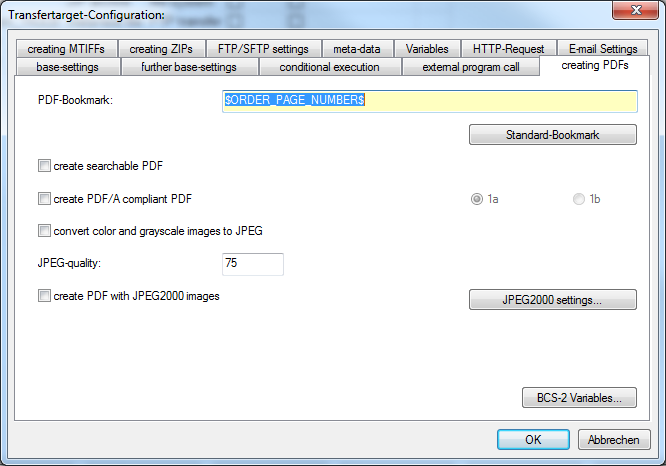
This transfer target type creates and transfers a PDF document containing the images of the current order into the target directory. The option is only available if the PDF module is licensed. As the file name $ORDER_NAME$.pdf is suggested, meaning the BCS-2® order identification with the ending .pdf (e.g. S0001253.pdf). In the tap creating PDFs further PDF-referring settings can be made. As the standard bookmark ORDER_PAGE_NUMBER is set, whereby a bookmark is set for each page of the order. Now it is possible to select – depending on the licensed modules – if a searchable PDF is to be created, a document in the PDF/A–Standard is generated and if all gray scale and color TIFF images are to be converted to JPEG, the JPEG quality can be set in the box beneath (100 = best image quality= largest file). PDFs with JPEG2000 images may also be generated, the JPEG2000 options can be defined in the appearing window after the JPEG2000 button was pressed.
4.2.3 Creating a Multi-Page-TIFF
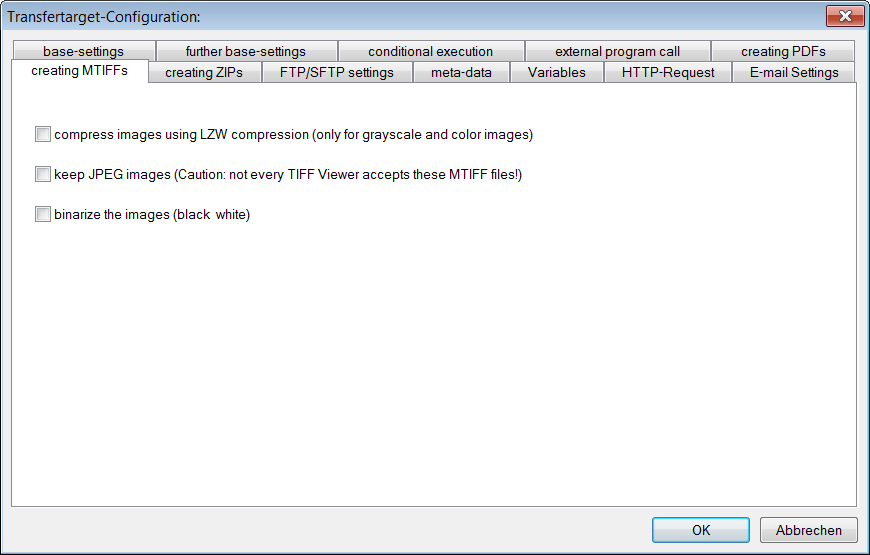
A Multi-Page-TIFF file including all images of the current order is created in the transfer directory when this option is selected. The filename is automatically set to $ORDER_NAME$.tif, meaning the BCS-2® order identification with the ending .tif (e.g. S0001253.tif). Further settings can be made in the tab creating MTIFFs.
- Compress images using LZW compression, only possible for gray scale and color images
- Keep JPEG images. Caution: not every TIFF Viewer accepts these MTIFF files
- Binarize the images. Turns all gray scale and color images into black and white images.
4.2.4 Creating a ZIP Archive
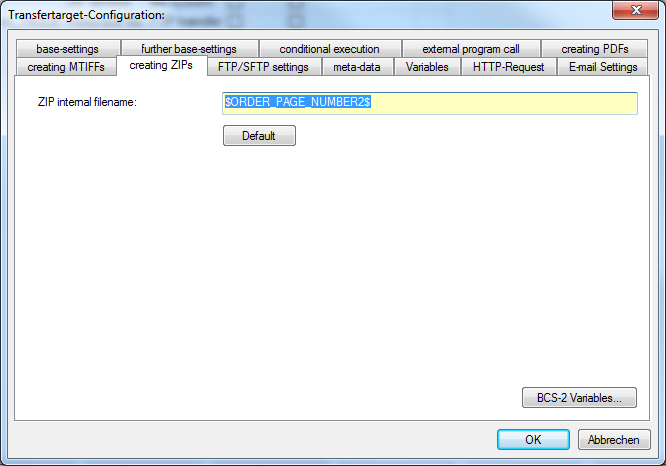
This transfer target type creates a ZIP-file in the target directory, containing all images of the current order. The filename is automatically set to $ORDER_NAME$.zip, meaning the BCS-2® order identification with the ending .zip (e.g. S0001253.zip). Further settings can be made in the tab creating ZIPs.
4.2.5 Creating a Meta-Text-File
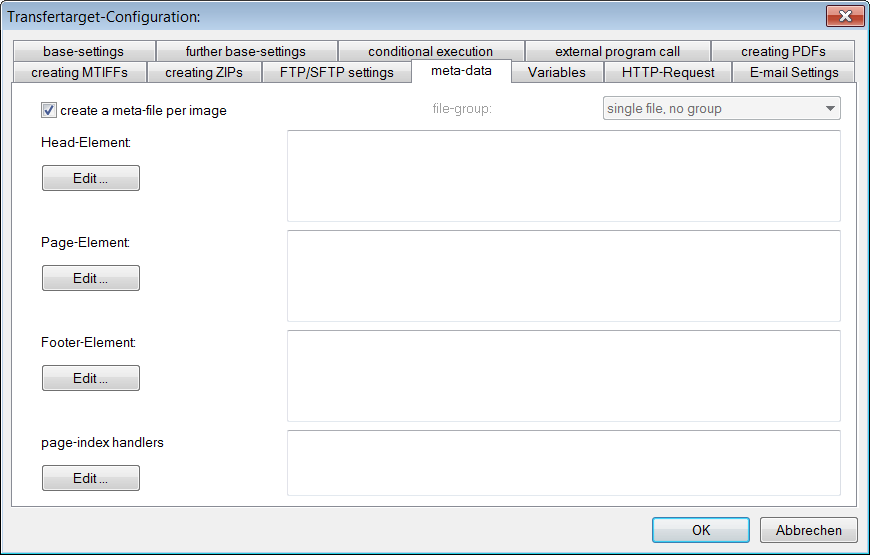
This option creates a meta-text-file in the target directory. Transfer targets of this type refer to – if available – the preceding transfer target of the types Image (normal transfer), create ZIP-Archive, create Multi-TIFF or create PDF (see above).
In previous BCS-2® Versions (< 3.4.20) it is not possible to generate a meta-text-file without the preceding transfer of images! In these older versions the image transfer target has to be located above the meta-text transfer target. Beginning with Version 3.4.20 it is only recommended to place a transfer target of the type “Image (normal transfer)”, “create ZIP-Archive”, “create Multi-TIFF” or “create PDF” as the primary target so that all image information’s are available for the generation of the meta-text-file. The transfer of only the meta-text-file is nevertheless possible, even though the recommendation appears.
The meta-text-file can be generated in the form of any desired text file like for example XML, HTML, CSV or simple TXT-files. As a standard format for meta-text-files BCS-2® suggests XML. To create such an XML-file, XML-knowledge is required. The same applies to HTML-files and other formats. As the standard file name $ORDER_NAME$.xml is suggested, meaning the BCS-2® order identification with the ending .xml (e.g. S0001253.xml). In case XML files are created it is necessary ensure their validity, because BCS-2® does not check the validity of XML files.
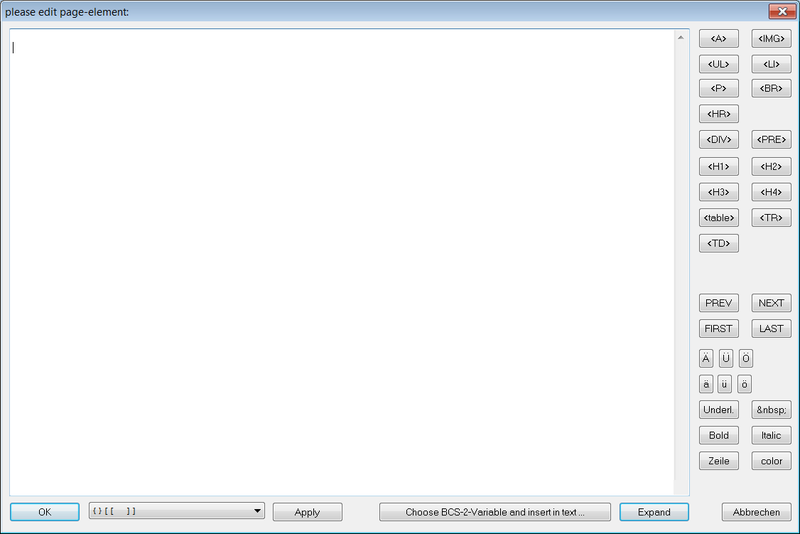
In the tab meta-data the configuration of the xml file takes place. Here individual expressions for the Head-, Page-, Footer-Elements and page-index handlers can be entered. To edit the desired element press the edit button beneath the corresponding element. Thereupon a new input dialog window will open, you can insert some HTML tags directly into the input field via buttons. Furthermore you can use BCS-2® variables, to link index values to the corresponding images within the meta-text–file, thereby making the access to order- and page index information of the order possible.
4.2.6 Call External Program

4.2.7 Unload Scan Order
With this option the entire scan order including the order-type is unloaded into a Zip-file and can then be loaded into a different BCS-2® whereby the images and metadata as well as the order-type are taken over. This option corresponds to the classic unloading of orders from BCS-2®. Transfer targets of this type enable the implicit creation of backups during the transfer of orders.
4.2.8 Define Variables
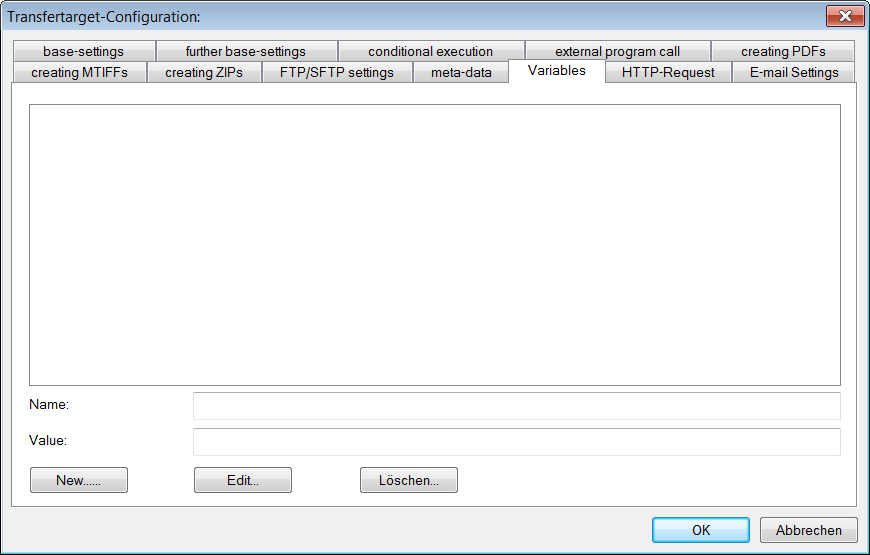
This transfer type allows you to define temporary variables in the context of the transfer. In the tab Variables the configuration can take place. A name and value can be assigned to each variable; the steps of creation correspond to the steps for the creation of user variables which are described in the user manual.
4.2.9 HTTP Request
This transfer target type allows you to send a HTTP request to a server. This can be for example the call up of a webserver subsequent to the transfer of images. In the tab HTTP Request for the configuration of this transfer target type all necessary options can be adjusted.
4.3 Transfer Modesadd section
4.3.1 File System
In this transfer mode the transfer to the respective file system takes place. It can be transferred locally or in a network. Enter the corresponding directory in the input field. Via the button … you can select the target directory directly in the file system, the button > will automatically inserted the last defined path into the field.
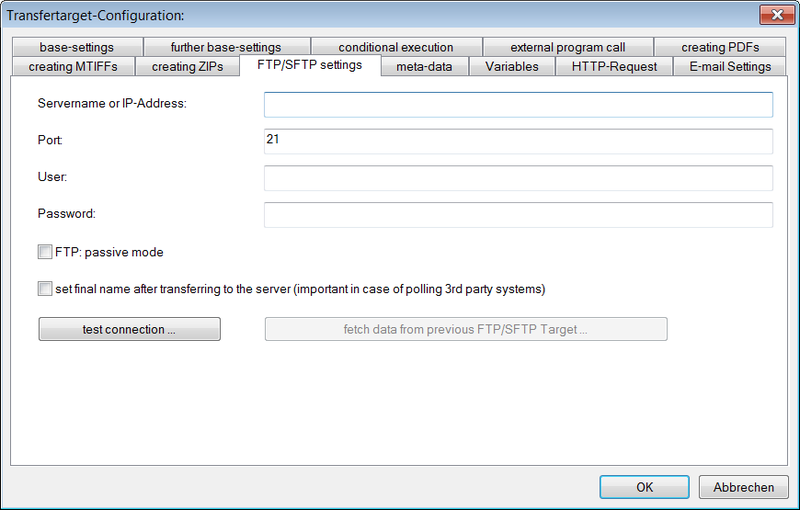
n this transfer mode the upload to a FTP server takes place. The target directory can be entered in the field directory. The FTP settings are made in the tab FTP/SFTP settings.
Here you will have to enter Server name/ IP-Address, user name and password. In case you have already entered the FTP data in one of the transfer targets in the list, you can fetch theses values by pressing the fetch data from previous FTP/SFTP Target button. The standard FTP port 21 is given, but it can be adjusted during the configuration. Furthermore you can select if you wish to transfer in the passive mode and if you wish to define the final name after the transfer, in case of polling 3rd party systems. After you have entered all needed data you can test the connection with the test connection button.
4.3.2 SFTP Transfer
In this transfer mode the FTP connection is tunneled via SSH, thereby providing a safe connection. As in the FTP transfer you need to enter the target directory and adjust the settings in the FTP/SFTP tab.
4.4 Image Operationsadd section
For all transfer types in which images are transferred (normal, create PDF, create Multi-TIFF, create ZIP-Archive) image operations can be configured which are executed during the transfer. Via the button configure image-operations a dialog window is opened in which the settings of the image operations can take place.
A variety of image operations can be selected from the dropdown list on the right side, i.a.
- Invert
- Flip horizontally/vertically
- Rotate 90°/180°/270°
- Scale to 72-2400 dpi
- Binarize/ turn into gray scale/ turn into true color
- Resize
After selecting a specific image operation it can be entered into the list by pressing one of the following buttons which can be found on the right side of the window Insert before Current Position or Insert after Current Position, depending on the sequence in which you wish the operations to be made. Furthermore following finishing operations can be executed, an “electronic endorser” can be added to the images and the “format” can be adapted to (A4, A3,etc) both can be defined individually. As a final operation it is possible to “adapt the file format”, you can choose if all images are to be converted to JPEG or TIFF.
Press the OK button to store the settings and exit the window. For detailed information about the image operations see Batch Module.
4.5 Apply Page Splitting/ Maskingadd section
If virtual splitting /masking was used in the order, the actual splitting /masking can take place during the transfer of the images.
The checkbox page splitting/masking has to be selected so that the button image-operations after splitting/masking is activated. The image operations are the same ones that you can find when you press the button configure image-operations, but these image operations will be used for the images after splitting/masking was executed, meaning the single images. The image operations before and after splitting can be combined as needed, e.g. deskew for the double page and for the single page or deskew for the double page, despeckle for the single page, etc.
4.6 Conditional Executionadd section
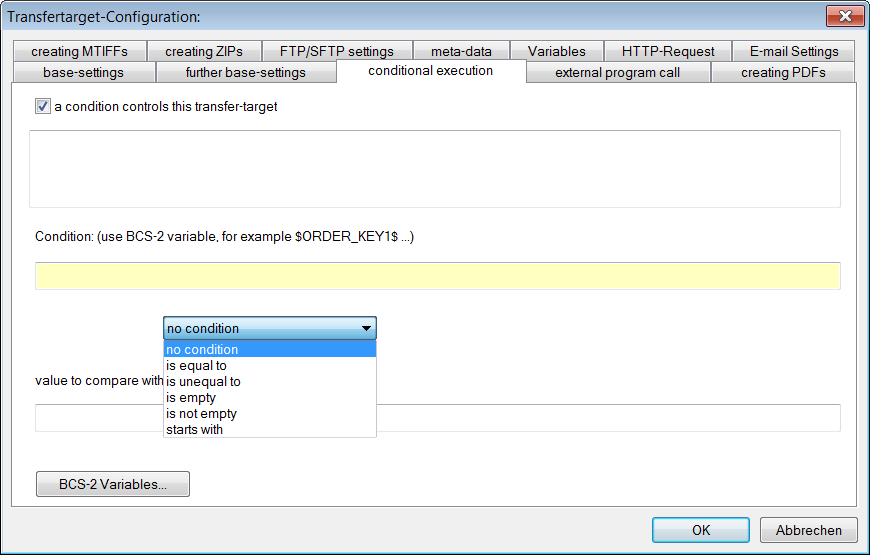
Via the tab conditional execution it is possible to link the application of a transfer target to a certain condition. It is deactivated by default, to activate it select the checkbox a condition controls this transfer target.
Via the tab conditional execution it is possible to link the application of a transfer target to a certain condition. It is deactivated by default, to activate it select the checkbox a condition controls this transfer target.
Enter a condition and reference value in the now active input field; with the help of an operator these two values are compared. The expressions can consist of free entries or BCS-2® variables. Six comparison operators are available: no condition, is equal to, is unequal to, is empty, is not empty, starts with. In the case of is empty and is not empty the entered value is unimportant, the condition is the existence or nonexistence of a value. Following example will explain the value of is equal to: If the word “book” is entered into the “order index 1” of an order, a PDF is to be generated. The other way around: If the word “book” isn`t entered into the “order index 1” no PDF is to be generated. To display this condition the BCS-2® variable for the order index 1, meaning $ORDER_KEY1$ has to be entered into the condition field. Book is entered into the value to compare field. As the operator “is equal to” is selected. When the order is transferred, the condition of the transfer target is evaluated and only if the condition is fulfilled the transfer target is used.