
12. Administration Menuadd chapter
12.1 User Administrationadd section
In the Set BCS2® User… option in the Administration menu user names can be entered in the form of name abbreviations.
If the Prompt for BSC2®-User on Startup… option is active, BCS-2® will request the user name during the system launch.
12.2 BCS-2® Variablesadd section
Program-internal or user-defined variables can be inserted in many input boxes within BCS-2®, they will expand (designated value of a variable is inserted at the defined position) when used. Variables can be used for example for the naming of files, etc. The use of variables is especially recommended for advanced users!
A list of all program-internal variables may be found within BCS-2 in the Help menu.
To use a variable, a $-symbol must precede it. In order for BCS-2® to recognize when the name of the variable is finished, one of the following symbols must be placed after the name:
1. blank (X’32’, space)
This is the default, the space will be retained after the expansion.
Example:
The variable APP_USER has the value John
Text in the input field: $APP_USER is the username
After expansion: John is the username
2.$-symbol
To make the strings (symbol-chains) connect.
Example:
The variable APP_USER has the value John
Text in the input field:[$APP_USER$] is the username
After expansion: [John] is the username
12.2.1 Quick Access to the Variables
The BCS-2® Variables… button can be encountered in many places within the BCS-2® program. After selecting an input box, which will then be highlighted in yellow, the BCS-2® variable selection can be started by pressing the BCS-2® Variables… button.
Now the variable that you wish to insert into the active input box can be selected from the list. A double-click or clicking the Apply button will place the variable at the cursor spot in the input box. This way multiple variables can be inserted into one input box. In the variable selection the category and description of each selected variable will appear.
A complete list of the BCS-2®variables can be called up via the menu point Documentation of System Variables... in the Help menu.
12.2.2 Administration of the Variables
The administration of the BCS-2® variables (the composition and querying) can be accessed in the Administration menu with the BCS-2® Variables… option.
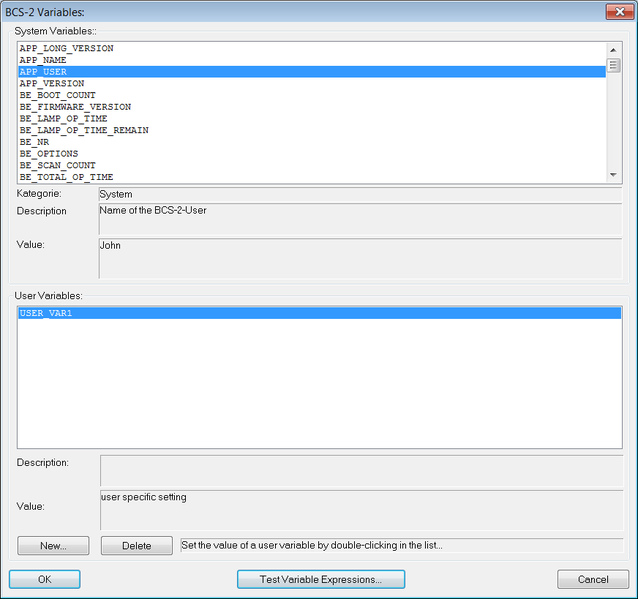
The current values and descriptions of the individual BCS-2® variables are displayed here. It is also possible to define user variables. These user-defined variables can have their own value and description. To display the current value of a variable, click on the system- or user-defined-variable or select the desired variable with the arrow keys. The corresponding value and description will appear in the boxes below the list.
Example:
As a username the abbreviation John is entered in the Set BCS-2® User… option in the Administration menu.
From now on the system variable APP_USER will display John as the value of the variable when it is selected.
Creating a User-Defined Variable:
To create a user-defined variable, click the New button. Now enter the name and description of the variable to be created. The variable will then appear in the list of the user-defined variables. Double-clicking on a user-defined variable allows a value to be defined or existing values to be changed. A BCS-2® user-defined variable can be removed with the Delete button. The selected variable will then be deleted.
12.3 Journal (optional)add section
Requirement: BCS-2® Journal Module
With the BCS-2® Journal module user defined journals containing specific user defined entries, e.g. transactions or events can be generated. For example a journal entry can be made each time an order is transferred or created, containing the current BCS-2® user, the order name, the date and time, etc.
The journals can be displayed in BCS-2®, or be exported as text, HTML or csv files. Detailed information can be found in the corresponding BCS-2® Journal Module manuel.
12.4 System Settingsadd section
- Speed-Mode is explained in the system settings, and is deactivated by default.
- In the Image Transfer before Next Scan area the direct creation of copies of the scanned images within an order can be activated. A target directory can be defined and if desired a directory confirmation message activated.
- In the WalkUp Emulator section, the WalkUp Configurator can be called up with the corresponding button. All relevant settings for the operation of BCS-2® in the WalkUp mode can be adjusted with the WalkUp Configurator. The WalkUp mode is intended for the use in the self-service environment, where the program is controlled via touch screen. Furthermore it is possible to select via checkbox if BCS-2® should directly launch in the WalkUp mode or not.
- Global settings for Export- and IndexSuite, the additional module IndexSuite can be activated in this area, if it is not activated only the basic page index appears when you select the Page Index button in the Order Options
- With the User-Help Settings the paths to where the Product- and Application-Help documents are stored can be set, which can then be called up via the Help Menu. Furthermore you can define which of the two helps is displayed when the F1 key is pressed.
- Automatic clean-up of scan order list
- Identification of this BCS-2® instance.
12.5 Dynamic Order Typesadd section
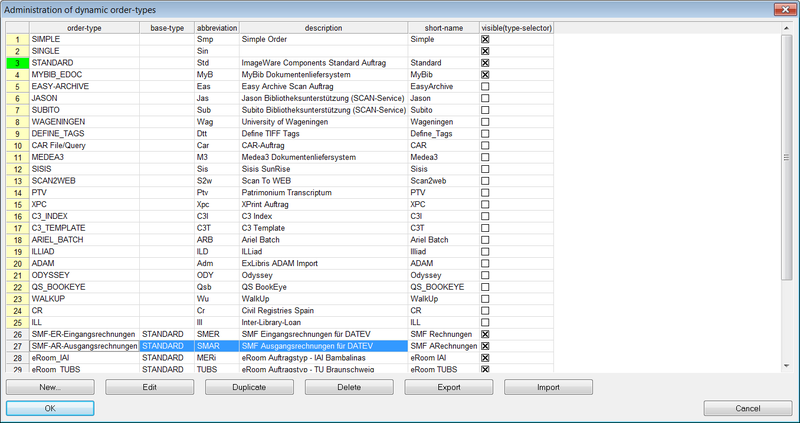
BCS-2® offers you the possibility to create your own order types on the basis of given standard order type. This function is accessed via the Dynamic Order-Type Administration… menu point in the Administration menu. Upon selection a dialog window containing a list of all existing order-types opens.
Within this administrative overview list you can, by using the corresponding buttons, Create, Edit and Delete order-types. Furthermore you can define if an order type is to be visible in the dropdown menu of the order bar or not, with the checkboxes in the visible (type-selector) column.
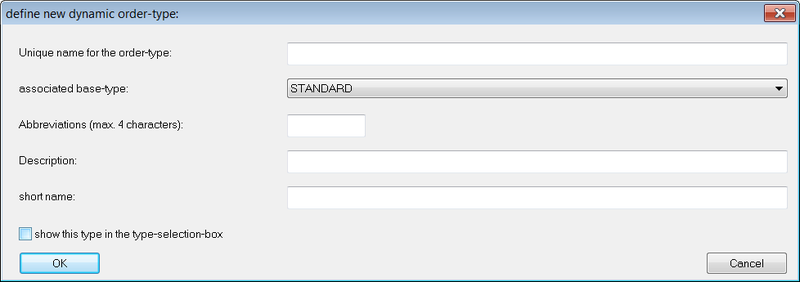
New Order-Types are created with the New button:
Name, abbreviation (maximum four letters), description and shortened name can be defined here.
Furthermore, a basic order-type needs to be attached to the new order-type. This basic order-type will considerably influence what will occur when an order is transferred.
Now you can individually adjust the order options of your own order in the Options dialog window in the Order menu. Due to the fact that every dynamic order type has its own defined settings they are particularly suitable for the creation of specific scan and post processing workflows. It is sensible to create a dynamic order type for each individual project, this way the specific details of a project for examples the subsequent transfers to determined file forms, can be defined and saved, allowing you to ascertain the specifics even a long time after a project has been finished e.g. if a new project is to begin with a similar workflow you can duplicate the former order type and simply adjust a few details.
Furthermore it is possible to import and export order types.
Export
To export an order type select the specific dynamic order type in the list thereby activating it for further processing. It can then be exported by clicking on the Export button. Thereupon the file directory will open allowing you to choose a folder within your local system to save the order. The file name will be generated automatically, consisting of a combination of the BCS-2 license number and the abbreviation of the dynamic order type, individual naming is also possible. The export operation is executed into an XML-file.
Import
To import a dynamic order type press the Import button, select the XML file containing your order type from the appearing file directory.
The successfully imported dynamic order type will be automatically added to the dynamic order type list. The possibility to import and export dynamic order types, allows you one the one hand to easily distribute an order type for example if you have installed BCS-2 ® on more than one PC on the other it is easy to save order types of finished projects and to reactivate them when needed.
12.6 Import Settingsadd section
Requirement: BCS-2® Import Module
The following file types can be imported into orders if the optional import module is activated:
- PDF files (optional)
- Winword documents
- Excel sheets
- Powerpoint presentations
- pure text files (.txt)
- HTML files (.htm or .html)
- ZIP files
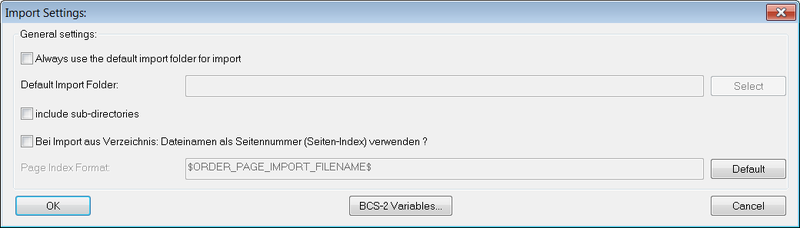
A default directory can be defined in the Import settings from which all files that are to be included in an order are imported. It is also possible to include subdirectories in the import.
If files are now added to the order with the Import Image Files… option in the Order menu, BCS-2® will use the directory set in the import settings. However only if the option Always use the default import folder for import? is activated. BCS-2® Variables are usable for the standard import directory, e.g. date.
12.7 OCR Settings (optional)add section
Requirement: BCS-2® OCR Module and BCS-2® OCR-Engine
The settings for the text recognition can be adjusted here.