
5. Index baradd chapter
When the IndexSuite is active, the defined index fields are displayed in an index bar which can be found in the BCS-2® work space below the Image viewer. The index bar consists of up to eight index fields, the currently active index field is highlighted. The colored line above the index fields displays the currently active index mode. The yellow box at left side of the bar displays the page orientation (N = normal (entire image), L= left side, R= right side).
A context menu with following options can be opened when you move the cursor into the index bar and press the right mouse key:
- Mode: first entry
- Mode: edit
- Mode: view
- previous index set: navigates to the previous index set of the image.
- next index set: navigates to the next index set of the image.
- Delete current index set: delets the currently active index set (N, L or R)
5.1 Index Mode add section
Three different indexing modes exist; they can be selected via the index bar context menu (see above).
5.1.1 First entry (FE – blue)

First entry is the standard mode it is used for the initial, continuous indexation, during scanning or after importing images. In this mode the index data of the current image is automatically applied to the next page and the auto-increment function applies.
In order for this process to work the order can´t contain any index data before the indexing process is started. When you import images the index data usually has to be deleted before the actual indexing can begin, due to the fact that at least one of your defined indexes is probably an option list (which are automatically filled with the first values of the option list) or one of the indexes is mandatory which will also cause the index fields to be automatically filled. To remove the index values from all pages select the option Remove page index data of this scan order which can be found in the Order menu. Now you can start indexing, begin with the first page and proceed page by page, all index data in the current page will be set for the following page when navigating from first to last page.
5.1.2 Edit (ED – green)

The editing mode allows the correction of the values of the individual index fields as well as the adding or deleting of index sets. However, there is no automatic takeover of the previous-page values.
5.1.3 Read only (RO – red)

In this mode index data is only displayed. Editing is not possible.
5.2 Page Orientationadd section
Three different types of index sets are available per page:
5.2.1 N (normal)

Capture the information of the entire page.
5.2.2 L (left)

Capture the information of the left half of the page.
5.2.3 R (right)

Capture the information of the right half of the page (R).
It is possible to navigate between the different index sets by using the CTRL + ← or the CTRL + → key combinations, or the context menu (right-click in the page index bar). When navigating to the next page (PgUp / PgDn), an index set is selected according to whether or not virtual page-splitting is active. When the virtual page-splitting is not active, N (entire page) is the active index set. When the virtual page-splitting is active, L (left half) is the active index set. It can occur that an index set does not exist due to active page-splitting. When navigating to an index set which is non-existent, a corresponding request will be displayed; after confirmation, the new index set will be created.
The current index set is displayed in the yellow field on the left side of the index bar (N for entire page, L for left half, R for right half). Above this the available index sets for the current page are displayed (e.g. LR). Additionally, the colored mode line covers the breadth of the entire page for index set N, but only the right or left side for index sets R and L. The current index set can be deleted by using the corresponding option in the context menu.
5.3 Assigning index valuesadd section
5.3.1 Entry into index fields
The values for individual page indexes can be entered directly into the appropriate index fields.
yes/no
For question fields the corresponding option must be checked. It is important to note that the entry must occur in the correct page index set.
Option list
If an option list is available for an index field a value from the list can be selected, or an individual value can be entered.
number fields
Depending on the configuration, Arabic or roman numerals or letters can be entered in number fields (e.g. page number). If the auto-increment function is active, this in-dex is incremented automatically on the next page.
If the OCR module is licensed for your installation of BCS-2®, the texts can also be entered via OCR. For this, the option OCR: Drag zone with mouse in the Image menu must be activated. Then, a zone can be designated over the desired text (e.g. a chapter title) by pulling the mouse. Holding the CTRL + SHIFT keys extracts the box content in the active index field after the OCR was performed.
5.4 Transfer index valuesadd section
Index values of a page or a single index can be set for the entire remaining order or a specific range of pages by using the feature Set page indexes of this page for the rest of the order in the Order menu. The following options are selectable:
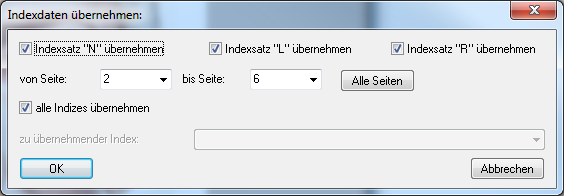
5.4.1 Transfer index data
Per page it is generally possible to select three index sets to be transferred; if not all are in use, only the created index sets are transferred. All index sets are checked by default.
5.4.2 Set page range
The range in which the page indexes are set can be defined here, e.g. from the cur-rent to the last page (default setting) or from the current page to the end of the chapter, etc.
5.4.3 Transfer indexes
By default the option transfer all indexes is active, meaning all values of all index fields will be transferred. If the option is deactivated the specific indexes to be transferred can be selected from a selection list. If multiple single indexes are to be transferred the dialogue for transferring indexes must be launched for each index.
5.5 Deleteindex dataadd section
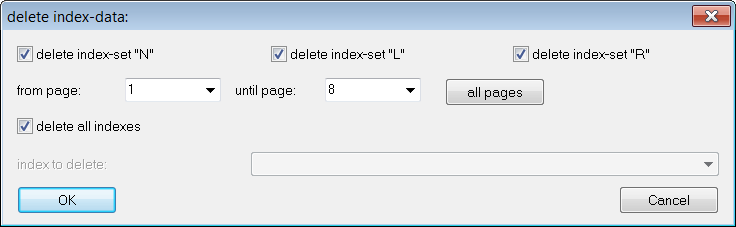
Index data of the current page or a single index set can be deleted for the remaining scan order or a specific range of pages using the Remove page index data of this scan order in the Order menu. The following options are selectable:
5.5.1 Delete index sets
Here it can be selected which index set of the current page is to be deleted. All index sets are checked by default.
5.5.2 Page range
Here it can be defined for which range the page indexes are deleted, e.g. from the current to the last page (default setting), from the first to last or from the current page to the end of the chapter, etc.
5.5.3 Delete indexes
By default the option delete all indexes is active, meaning all values of all index fields are deleted. If the option is deactivated the specific indexes to be deleted can be selected from a selection list. If multiple single indexes are to be deleted the dialogue for removing indexes must be launched for each index.
5.6 Display meta dataadd section
The existing metadata of an order can be displayed for all editing modes using the CTRL + SHIFT + I key combination, e.g. for correction purposes. A new Explorer window will open in which the existing order indexes and the corresponding page indexes per page and index set are displayed.
5.7 Navigationadd section
| Img↑ / Img↓ (i.e. page ↑ / page↓) | Navigates between the single pages of a scan order | |
| CTRL + ← / CTRL + → | Switches between the single index sets of a page | |
| CTRL + / CTRL – | Increase / decrease the number in the active index field (for keyboards without separate number | pads: CTRL + Fn + “+” / “-“ of the enabled number pads) |
| CTRL+SHIFT+i | Display meta data |