

6. Tab Transfer Targetsadd chapter
Via the “Transfer Targets” tab, you define the transfer target for the workflow. For the MyBib eDoc workflow, you set the transfer type and the image formats to be transferred. In addition, conditions for the transfer of the job can be defined.
In the list view of the tab, BCS-2 displays the most important details of the basic settings of the transfer destination.
- Name: Name of the transfer target
- Active: Shows whether the transfer destination has been activated for the transfer of the jobs
- Type: Transfer Type
- Global Condition
- Page Condition
- Description: Brief description of the transfer target
To edit the stored transfer destination, first select it in the list view. By double-clicking or clicking on the “Edit” button, you can call up the dialog for configuring the transfer destination.
6.1 Basicadd section
In the “Basic” tab, make the basic settings for the transfer target. BCS-2 displays some of this information in the list view of the transfer target.
Name: Name of the transfer target
Description: Brief description of the transfer target
Author: Author of the transfer target
Type: The transfer type determines what happens to the data of a job during the transfer. For the upload to MyBib, select the type “Upload to MyBib eDoc system” from the drop-down list.
Channel: “normal transfer in the file system”.
Target Folder: No input required for MyBib workflows.
Target Filename: No input required for MyBib workflows.
6.2 Conditionsadd section
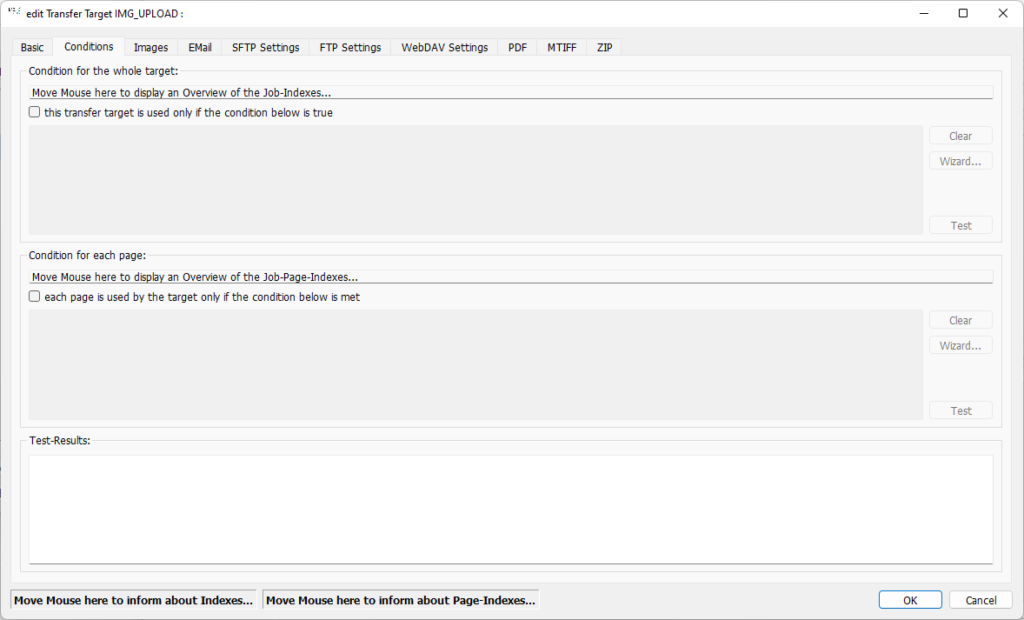
In the “Conditions” tab, dependent conditions can be formulated in the job or page index. These conditions must be met during the transfer in order for a job or pages of a job to be transferred.
In the upper area of the dialog you define conditions for the entire transfer destination, in the lower area for the pages of a job.
By ticking the item “this transfer target is only used if the condition below is true” and/or “each page is used by the target only if the condition below is met”, the respective dialog is activated.
Use the “Wizard” button on the right to call up the Wizard for creating conditions.
6.2.1 Global Conditions for the transfer target

In the left drop-down list, the job index to be checked is selected, which is checked against the comparison value to be entered in the right field. BCS-2 offers all existing indexes in the workflow.
From the 2nd drop-down list, select one of the following conditions:
- is equal to
- is not equal to
- begins with
- ends with
- is greater than
- is less than
- is greater or equal to
- is less or equal to
Conditions for each page
Requirement: Module IndexSuite
6.3 Imagesadd section
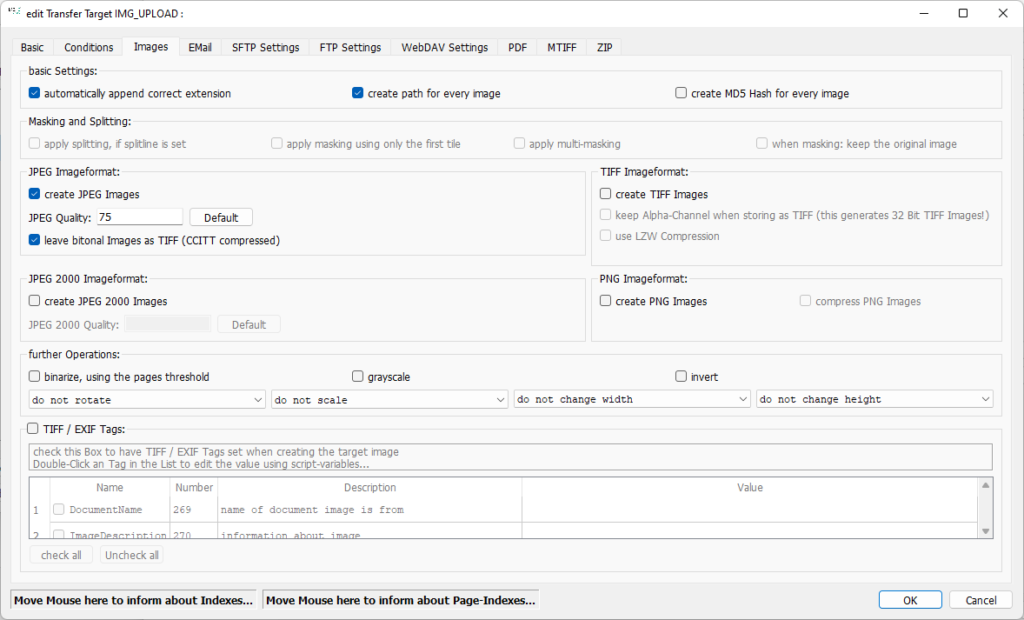
In the “Images” tab, you define the image formats for the respective transfer type. By ticking the respective options, they are activated for the transfer destination. To avoid unnecessary conversion of the images, you should choose the image formats so that they either correspond to the transfer formats of the MyBib eDoc service or support them in the best possible way.
6.3.1 Grundeinstellungen
automatically append correct extension: The file extension for the selected file format is automatically appended to the file name (e.g. . tiff, .jpeg)
This option must be activated, otherwise the images cannot be displayed correctly by the Windows system.
6.3.2 Masking and Page Splitting
apply splitting, if splitline is set: The images are split before the transfer if a split line is set.
apply masking using only the first tile: The images are cut before transfer if there is a mask or area on an image.
apply multi-masking: The images are cut before transfer if there are one or more areas on an image.
when masking: keep the original image: The original images are not replaced and transferred by cropping the images. The original is always in the order before the cut image.
6.3.3 JPEG Image Format
create JPEG Images: The images are uploaded as JPEG files.
JPEG Quality: Here you set the JPEG quality of the images, where 100 is the highest selectable quality. The level of quality affects the file size and the quality of the resulting image. (The higher the quality, the larger the image file and the higher the quality of the images (fewer artifacts)).
leave bitonal Images as TIFF : All bitonal images are stored as TIFF images. If this point is not activated, the binary images are automatically converted into 8bit images during the saving process.
6.3.4 TIFF Image Format
create TIFF Images: The images are uploaded as TIFF files.
keep Alpha-Channel when storing as Tiff:
Instead of 24 bit TIFF files, 32 bit TIFF files are generated.
use LZW Compression: The lossless compression method LZW is used to compress the TIFF files.
6.3.5 PNG Image Format
create PNG Images: The images are saved as PNG files.
6.3.6 Further Operations
binarize, using the pages threshold: When converting grayscale or color images into bitonal images, the threshold values stored for the images (default value 128) are used.
Grayscale: Convert color and b/w images to 8bit grayscale images.
invert: Before saving, the image colors are reversed.
Rotation: The following options are available from the drop-down list
- do not rotate
- rotate 90° Degrees
- rotate 180° Degrees
- rotate 270° Degrees