

5. Masksadd chapter
5.1 Functionadd section
Use masks to crop and split images. The following functionalities are available for this:
- Crop image (mask)
- Crop and split image
- Batch processing
If you select the mask function, BCS-2 displays a mask with a green background on the image. You can move and resize the mask within the image. BCS-2 displays the size and position of the masks on the respective preview images. Both are individually configurable for each image.
The command for splitting or cropping the images is done either directly for each image (enter key or confirm icon action) or in batch for all images via the job operation “Apply masking” in the “Job” menu.
If the defined mask is too large for a subsequent or selected image, the mask will not be accepted. A separate mask must be created for the smaller image.
5.2 Workflow-specific Featuresadd section
In the basic workflow settings, you activate functions that significantly influence the behavior of the masks within a workflow. These include:
- “clone selections of the previous image when inserting a new image into the job”: BCS-2 automatically applies masks to the next image. You can then trim the images using a batch operation. Alternatively, each image can be cropped with “Enter”. BCS-2 then adopts the mask for the subsequent, newly inserted image.
- When closing selections: adjust the selections of the previous image, if they do not fit: BCS-2 adjusts the tiles so that the tiles from the previous image are transferred to the following image, even if it was originally larger than the subsequent image.
- “advance to the next image after splitting or cropping”: If this option is not activated, BCS-2 continues to display the image after cropping an image.
- “Clone selection when performing crop or multi-crop operation”: BCS-2 automatically applies masks to the next image.
5.3 Mask Typesadd section

Simple Mask: BCS-2 calls a mask. The mask area has a colored background. You can change the size of the mask by moving the edges or using the context menu. By pressing the “Enter” key or the “Confirm action” icon, you cut out the selected area and insert it into the job as a new image. This action cannot be undone.

Mask with split line: BCS-2 invokes a mask with a split line. You can change the size of the mask by moving the edges or using the context menu. The split line can be freely moved within the mask. By pressing the “Enter key” or the “Confirm action” icon, you cut out the selected area, divide it and insert it into the job as two new images. This action cannot be undone.

Activate mask with gutter: BCS-2 calls a mask with two parallel split lines. If the image is split, BCS-2 cuts away the gutter. You determine the width and position by moving the lines or the entire gutter.

Activate mask with overlapping gutter: BCS-2 calls up a mask with two parallel dividing lines and a gutter. When the image is divided, BCS-2 adds the gutter. You determine the width and position by moving the lines or the entire gutter.
5.4 Masks Context Menuadd section
A context menu with options is available for each selected area and mask. You call up the context menu by right-clicking in the mask area.
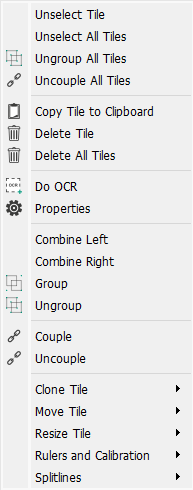
Delete Tile: BCS-2 removes the selected mask.
Delete All Tiles: BCS-2 removes all masks selected on the image.
Clone Tile: BCS-2 duplicates the selected area. The following options are available as a position for the new area:
- Clone Left
- Clone Right
- Clone Top
- Clone Bottom
If the new mask does not fit next to the selected area, BCS-2 creates it in an overlapping manner.
Move Tile: Tiles can be renumbered and moved to central positions in the image using the following options:
Areas can be renumbered and moved to central positions in the image using the following options:
- To Top: The selected tile is given the number 1. It is inserted into the job as the first new image after the image has been split.
- To Bottom: The selected tile receives the highest number. It is inserted into the job as the last image after a split.
Change of position:
- Move To Center: The tile is positioned centrally in the image
- Move To TopLeft: The tile is moved to the upper left corner
- Move To TopRight: The tile is moved to the upper right corner
- Move To BottomLeft: The tile is moved to the lower left corner
- Move To BottomRight: The tile is moved to the lower right corner
Adjust area: Areas can be enlarged or reduced to a defined size. The following options are available for this:
- Resize to Full
- Resize to A3
- Resize to A4
- Resize to A5
- Resize to User Size in mm
If an area is to be enlarged, you must note that the zero point for calculating the area is the top left-hand corner. Position the area so that there is enough space to the right of and below the zero point so that the area can be enlarged.
Splitlines: Splitlines can be positioned in the area in order to divide the selected area horizontally and/or vertically. The following split lines are available:
- Toggle Left Splitline (split horizontally)
- Toggle Right Splitline (split horizontally)
- Toggle Top Splitline (split vertically)
- Toggle Bottom Splitline (split vertically)
- Center Splitlines Automatically
- Center Splitlines
- Reset Splitlines
With a split line, you can easily divide the tile, regardless of whether you choose the left/right or top/bottom splitline.
If you activate a pair of split lines (left and right, top and bottom), you can split the areas in two ways, depending on how you position the split lines.
- Middle area is cut away: In the combinations left splitline on the left side of the area, right split line on the right side of the area and upper split line in the upper part of the area, lower split line in the lower part of the area, BCS-2 removes the area between the lines (area with a turquoise background) for a division.
- Middle area is appended to both new images (overlapping): In the combinations left split line on the right side of the area, right split line on the left side and top split line on the bottom part of the area, bottom split line on the top part of the area, BCS-2 adds the area between the lines (area with a turquoise background) in the case of a split to both resulting images.