

4. Areasadd chapter
4.1 Functionadd section
In order to use areas for dividing or cropping images, you must activate the option “Use the ENTER key to transfer the existing areas to the job as images” in the associated workflow. The “Select area” and “Select multiple areas” functions can only be called up via the context menu of the viewer. In addition to cropping images or cutting out image sections, areas are used for indexing, metadata enrichment or in the context of C-3 Plus as a marker, e.g. for article entries.
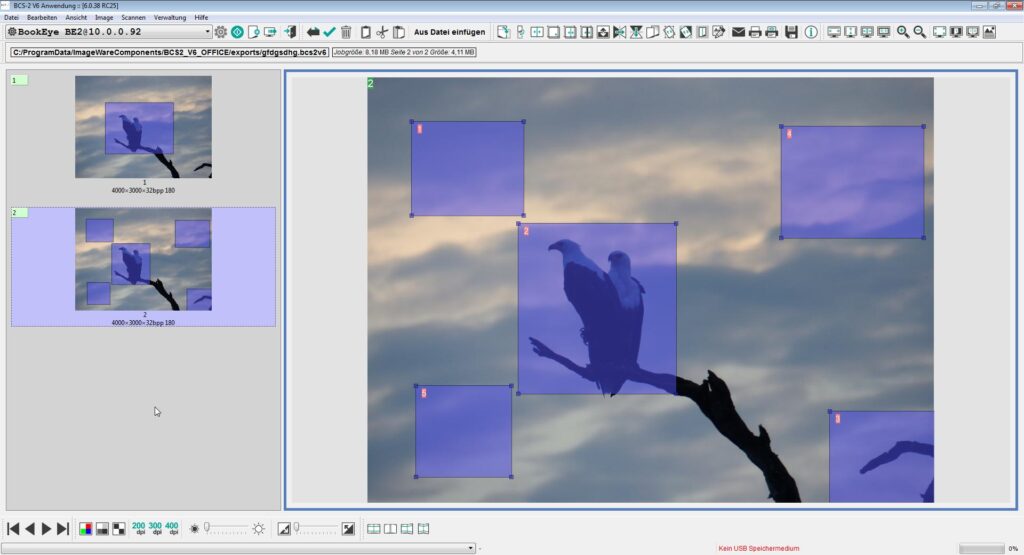
You mark an area by holding down the left mouse button and marking the desired image section of the image. The selected area has a blue background. BCS-2 displays the area number in the left corner of the tile. The numbering is in the order in which you created the areas.
4.2 Workflow-specific featuresadd section
Activate functions that influence the behavior of the areas within a workflow in the basic settings of the workflow. This includes:
“Apply selections from the previous page to the new page”: BCS-2 automatically applies the selected areas to the next image. You can finally crop the images via a batch operation. Alternatively, you can crop each image with Enter.
When closing selections: adjust the selections of the previous image, if they do not fit: BCS-2 adjusts the tiles so that the tiles from the previous image are transferred to the following image, even if it was originally larger than the subsequent image.
“Automatically go to the following image after page splitting or masking”: If this option is not activated, BCS-2 will continue to display this image after cropping an image.
“Clone selection when masking or multi-masking is performed”: If this option is activated, BCS-2 automatically takes over the areas after performing a masking on the next image.
“Use the ENTER key to transfer the existing areas to the job as images”: If this option is not activated, areas cannot be used for dividing or cropping images. In this case, only the masks and split lines are available for cutting the images.
4.3 Areas Context Menuadd section
A context menu is available for each area. You can call up the context menu by right-clicking on the selected image section. BCS-2 Professional and Office differ here with regard to the number of functions:

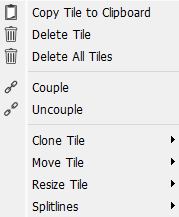
Unselect Tile (only Professional): Deactivates the tile selection, the tile is no longer marked. (The M in the left comer disappears)
Unselect All Tiles (only Professional): The selection of all tiles is removed (The M in the left comer disappears)
 Ungroup All Tiles (only Professional): The entire area group is dissolved (The G in the left corner of the tile disappears)
 Uncouple All Tiles (only Professional): Separates the previously paired areas. They can now be edited independently again.
 Delete Tile: The selected tile is deleted.
Delete All Tiles: All tiles are deleted.
 Do OCR: BCS-2 carries out text recognition (OCR) for the selected area. If BCS-2 has already performed a page OCR and the option “When performing OCR for the whole page: keep the resulting OCR-Doc object for later use” is activated in the workflow, the OCR execution is omitted. In this case, BCS-2 extracts the OCR data of the area from the result of the page OCR. This saves time and ABBYY clicks and therefore money. In addition, performing the page OCR leads to a better result (context-sensitive OCR).
 Detect Barcode (Prerequisite barcode module): BCS-2 reads out the barcode of the selected area and saves the result in the clipboard and in the properties of the area for reuse.
Properties (only Professional): The properties dialog of the area is called. The properties of an area can be used, among other things, as a tool for indexing and metadata enrichment.
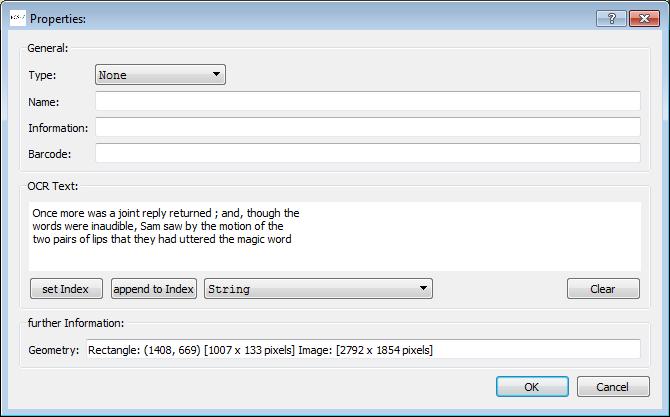
Assign the OCR results of an area to a job index via the “Properties” form. To use this feature, the workflow and indexes must be configured as follows:
- Workflow: In the workflow (“OCR” tab), activate the option “let te user set a tile’s OCR text to a selected index”
- Indexes: Enable the option “this index is selectable when assigning a tile’s OCR to an index”
- Type: Assignment of an area to a text type (e.g. heading, text, caption)
- Name: Name of the area Information: Optional short description.
- Barcode: Value of the read out barcode.
- OCR Text: OCR result of the area.
- Geometry: Shows the position of the area within the image and the size of the image.
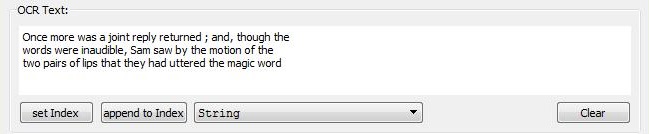
Use the buttons below the OCR text window to assign the OCR results to an index that can be selected from the drop-down list.
- Set index: Accepts the result as a new job index, existing entries are overwritten.
- Append to index: Appends the OCR text to an already existing index value.
- Clear: Clears the OCR text.
When using areas for job indexing, it is recommended to activate the option automatically open the tile properties on clicking the tile in the OCR tab, so that the dialog does not have to be called via the context menu.
Combine Left (Professional only): Appends and groups the area to the left of the selected area.
Combine Right (Professional only): Appends and groups the area to the right of the selected area.
 Group (Professional only): Joins multiple areas on an image as a group. Grouping areas makes it possible to move them on the image at the same time or to insert them into the job together as a new image. BCS-2 does not delete the original image with this action. Grouped areas are denoted by a “G” on the left side of the tile. Areas can also be grouped using CTRL and a mouse click.
Ungroup (Professional only): Removes the selected area from the group.
 Couple: BCS-2 couples areas together to move or enlarge them together. When you click ENTER, BCS-2 treats them as normal areas, i.e. BCS-2 cuts out the areas individually and pastes them as a new image. Paired areas are denoted by a C on the left side of the tile.
Uncouple: BCS-2 uncouples the area and thus separates it from the other area(s).
Clone area: Duplicates the selected area. The following options are available as a position for the new area:
- clone to the left
- clone to the right
- clone up
- clone down
If the new area does not fit next to the selected area, it will be created overlapping.
Move tile: BCS-2 moves the area and renumbers it. Thefollowing options are available for this:
Change tile order:
- To Top: The selected area is given the number 1 and is inserted into the job as the first new image after the image has been split.
- To Bottom: The selected area receives the highest number and is inserted into the job as the last image after a split.
Change position:
- Move to center: positioning in the center of the image
- Move toTopLeft: The area is moved to the upper left corner
- Move toTopRight: The area is moved to the upper right corner
- Move to BottomLeft: The area is moved to the lower left corner
- Move to BottomRight: The pane is moved to the lower right corner
Resize Tile: Enlarges or reduces the area by the defined size. The following options are available:
- Resize to full (entire image)
- Resize to A3
- Resize to A4
- Resize to A5
- Resize to user-size in mm: Specify the desired size in mm or pixels
If an area is to be enlarged, you must note that the zero point for calculating the area is the top left-hand corner. Position the area so that there is enough space to the right of and below the zero point so that the area can be enlarged.Rulers and Calibration (Professional only): Shows different rulers in the areas. It is also possible to determine and adjust the true resolution of the area.
The following options are available:
- hide ruler
- horizontal ruler (cm)
- vertical ruler (cm)
- horizontal ruler (inches)
- vertical ruler (inches)
- calibrate image
In the “Calibrate image” dialog you determine the real resolution of the current image section and thus the real dpi of the image:
- Current selection: Displays the current size (width and height) and the resolution.
- Adjusting the resolution: Determines the real resolution (dpi) of the image section. This value can be included in the metadata and used to correct the resolution of the entire image.
In order to determine the true resolution, the size of the selected area must be known, i.e. the scan must contain an area with a defined size that can be framed. Use the batch operation “Set DPI of image to DPI of current job-page” in the “Job/Execute operation on the job” menu to adopt the real resolution for all images.
Split lines: Position split lines in an area to split the selected area horizontally and/or vertically. The following dividing lines are available:
- Toggle Left Splitline (split horizontally)
- Toggle Right Splitline (split horizontally)
- Toggle Top Splitline (split vertically)
- Toggle Bottom Splitline (split vertically)
- Auto-center Splitline: The position of the split line is automatically corrected when an area is enlarged/reduced
- Center split line
- Remove dividing lines
Using a split line, BCS-2 simply divides the area, regardless of whether you select the left or right or top or bottom split line.
If a split line pair is activated, the type of division depends on the positioning of the split lines:
Middle area is cut away: BCS-2 removes the area with a turquoise background between the split lines (left-red, right-blue, top-green, bottom-yellow).
The middle area is added to both new images (overlapping): BCS-2 adds the area with a turquoise background to both images created during the split.
4.4 Properties Dialogadd section
You can record and process metadata for each area. If the option “automatically open the tile properties dialog on clicking the tile” is activated in the workflow, BCS-2 automatically opens the properties form when you click on the respective area. Otherwise open the dialog via the context menu of the respective area.
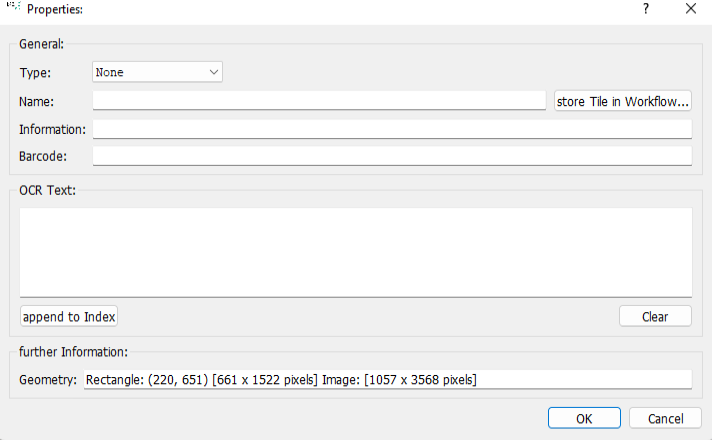
- Type: Assigns the area to a text type (e.g. heading, text, caption) via a drop-down list.
- Name: Name of the area
- Information: Optional short description
- Barcode: Value of the read barcode within the range
- OCR Text: Displays the OCR result of the area.
- Geometry: Shows the location of the area within the image and the image size.
Indexing – takeover of OCR results
You can assign the OCR results of an area to a job index. To do this, activate the option “let the user set a tile’s OCR text to a selected index” in the workflow. In addition, indexes must exist for which the option “this index is selectable when assigning a tile’s OCR to an index” has been activated.
Use the buttons below the OCR text window to assign the OCR results to an index made available via a drop-down list.
- set Index: BCS-2 accepts the result as the new job index and overwrites existing entries.
- append to Index: BCS-2 appends the OCR text to an already existing index value.
- Clear: Clears the OCR text.
4.5 Calibrate Imageadd section
In the “Calibrate image” dialog, which you can call up via the context menu of the “Rulers and calibration” areas, determine the real resolution of the current image section (real dpi). The calculated values can be used for the entire image.
Use the batch operation “set DPI of Image to DPI of current Job-Page” in the “Apply operation on job” menu to adopt the real resolution for all images.

- current Rectangle: In the upper half of the dialog, BCS-2 displays the current size (width and height) and the resolution of the selected area.
- Adjusting the resolution: In the lower area you determine the real resolution (dpi) of the image section. This value can be included in the metadata and used to correct the resolution of the entire image.