

3. Image Context Menuadd chapter
All functions marked with * are also available as toolbar icons.
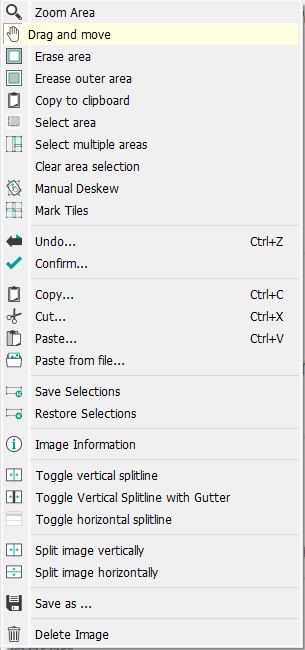
Right-clicking on the current image opens the “Image” context menu. Image editing functions are also available here, which can only be called up and activated via the context menu.
3.1 Image Functionsadd section
 *Enlarge area: By marking an image area, you enlarge this area. Turning the scroll wheel of the mouse causes the image to scroll vertically. Hold down the SHIFT key to scroll horizontally. If you hold down the CTRL key, the image will be scrolled in or out, depending on the direction of movement of the scroll wheel.
 *Drag and move: Use this function within an enlarged image view to navigate or move the image. To pan the image, hold down the left mouse button and drag the mouse in the direction you want to pan.
 *Delete area: Colors the content of the selected area white and initially moves it to the clipboard. It can now be inserted into the job as a new image or transferred to another document.
 *Erase outer area: Colors the area outside the selected area white and puts it on the clipboard.
 OCR Zone to ClipBoard (Professional only): By dragging an area, you copy the OCR data of this area to the clipboard for transfer to the job or page indices. BCS-2 also displays the OCR result for correction in the toolbar with the icon for OCR areas.

 Manual Deskew: Serves to horizontally align the text within the images. Hold down the left mouse button and draw a vertical or horizontal correction line. BCS-2 determines the correction angle and displays it in the viewer.
3.2 Area Functionsadd section
Select area (t): Marks an image section with a tile, from which BCS-2 creates a new image.
 Select multiple areas: Marks multiple image sections with a tile. BCS-2 shows the order of the marked areas by numbering within the tile.
 Delete area selection: BCS-2 deletes all created areas (tiles).
 *Remove tile on click (Professional only): Deletes multiple tiles using SHIFT and a left mouse click. Alternatively, drag an area around multiple tiles to delete them all at once.
 *Unite tiles on click (Professional only): Merge multiple tiles in an area using SHIFT and left-click. Alternatively, drag a region across multiple tiles to merge them.
 *Mark tiles: BCS-2 simultaneously marks several tiles on the image for editing while holding the SHIFT key and left-clicking. BCS-2 identifies marked tiles with an “M” next to the tile number.
 *Save selections BCS-2 saves the position of the existing areas. This feature is especially useful in the context of using C-3 Plus.
 *Restore selection BCS-2 retrieves previously saved areas and displays them on the image. This feature is especially useful in the context of using C-3 Plus.
3.3 Basic functions in the context menuadd section
 *Copy to clipboard: Copies the selected area to the clipboard. The copy can e.g. be inserted as a new image in BCS-2 or in another document.
 *Undo (Ctrl+Z): Resets all operations performed on the image. BCS-2 displays the original image or the last saved version of the image.
 *Confirm change: Confirms actions taken and saves the edited image. The new image replaces the original one.
*Copy (Ctrl+C): Copies an image or parts of it to paste it somewhere else in the job.
To copy an image section, first select the "Copy" function and then use the mouse to drag a sector over the required area. BCS-2 copies this area and stores it in the clipboard until a new image or partial image is copied or cut.
 *Cut (Ctrl+X): Cuts the image out to paste it elsewhere in the job.
 *Paste (Ctrl+V): Pastes a cut out or copied image or a range of images from the clipboard after the currently selected image.
 *Paste from file: Adds images from a file folder to the current job.
 Information about the image: When importing images, BCS-2 reads out the image information (size, resolution, color depth, manufacturer, etc.). You can access this information via the “Information” menu item.
Toggle grid… (Professional only): Displays an auxiliary grid on the image.
 Save As: Saves a single page. Use the save dialog to determine the storage location and the export format for the image.
 *Delete image: Deletes the current image after a security prompt.
3.4 Split Linesadd section
 *Toggle vertical split line: Shows a freely positionable, vertical splitline in the image. You then split the pages with “Enter” or the function “Split image vertically” in the image menu (or in the context menu).
 *Toggle vertical split line with gutter: Displays a vertical split line with a gutter in the image. Split the pages with “Enter” or the function “Split image horizontally” in the image menu. The gutter is removed.
 *Toggle horizontal split line: Displays a horizontal splitline in the image. Split the pages with “Enter” or the function “Split image horizontally” in the image menu.
Split image vertically (action): Splits the image based on the vertical splitline.
Split image horizontally (action): Splits the image based on the horizontal splitline.