

6. Installation and Registrationadd chapter
6.1 Installation Requirementsadd section
Minimum hardware requirements:
- Windows 64-bit with a multi-core processor > 2.2 Ghz.
- Hard disk with 20 GB free space
- 4 GB of memory
- 17 inch screen
Recommended hardware requirements:
- Windows 64-bit with a multi-core processor > 3 Ghz
- Hard disk with 50 GB free space
- 8GB of RAM
- 22 inch screen
Please note the scanner-specific connection requirements for parallel network and scanner operation.
6.2 Hardware Recommendations for Working with Workflowsadd section
OCR processing of many color or grayscale scans
- 64-bit PC with a multi-core processor > 3 Ghz
- Hard disk with 50 GB free space
- 16 GB of memory
Notes on using the ABBYY OCR engine
- Memory: For processing multi-page documents – at least 1 GB RAM, recommended: 1.5 GB RAM.
- Hard disk space: 800 MB for library installation and 100 MB for
Application operations plus an additional 15 MB for each processing page of a multi-page document.
- For more information, visit website of ABBYY.
Notes on using the Tesseract OCR engine
- Hard disk space: 2.4 GB plus language packs
- RAM: 1GB
Repro and Retro Digitization – Processing of large and numerous files
- 64-bit PC with a multi-core processor > 3 Ghz
- Hard disk space: 500 GB free space
6.3 Software Requirementsadd section
- Windows 11
- Installation and configuration rights (administrator rights)
- Read and write rights in the BCS-2 program, data and job directories for other user accounts on the computer
We require an installation on a locally available user profile. By default, we do not support installation variants that deviate from this, such as installation on a server profile or a virtual machine. These are in the responsibility of the customer. BCS-2 does not support multi-user access and should therefore only be run by a registered user, otherwise the correct connection of scanners cannot be guaranteed.
6.4 Quick Start BCS-2add section
Step 1: Download
Download BCS-2 to your PC via the link given on the license certificate or our download page “BCS-2 and OCR Files – IWC Manuals”.
Step 2: Installation of BCS-2
Start the installation routine. Note that you have administrator privileges on the PC to install it. Detailed instructions can be found in the next chapter “Installation – IWC Manuals“.
Step 3: Registration and Licensing of the Software
To register the software, have your BCS-2 license certificate ready. Register BCS-2 via the online registration under “Administration/ Perform Software Registration” in the BCS-2 menu, see “Online Registration“.
Step 4: Activation of BCS-2
After successful registration, BCS-2 automatically downloads your personalized license file and license certificate. Restart BCS-2 to automatically activate the license file.
Step 5: License
You can access the file folder with the license certificate via the “Help” menu >> “About BCS-2” >> “Open license folder”.
6.5 Installationadd section
- The installation takes place via the bcs2_v6_office_setup or bcs2_V6_prof_setup. Start the setup and follow the installation instructions.
- Select expert mode for the installation if you create the configuration directory in a non-standard location.
- After completing the BCS 2 installation, you will see two new icons on your desktop. On the one hand for “BCS-2” itself and on the other hand for the administration or configuration of the application: For BCS-2 Professional this is the “BCS-2 Administrator” for the Office version the “BCS-2 Configurator”.
After starting BCS-2, the “Configurator” or “Administrator” for the first time, BCS-2 indicates that your license is invalid. Confirm this message and then open the software registration dialog via the “Administration” menu. Have your BCS-2 license certificate ready to register the software.
Installing the 6.6.x version of BCS-2
With the current 6.4.x und 6.6.x versions of BCS-2 Office and Professional, there might be an error message after a new installation when starting the software for the first time (Configurator, Administrator and Application). This message refers to the lack of a DLL file that is needed for BCS-2 to run. The file MSVCP140.dll or MSVCP140_1.dll is required.
Information on how to install these files can be found in our FAQ. BCS-2 Installation
6.6 Upgrades/Updatesadd section
New versions or upgrades are imported as updates. The BCS 2 versions are downwards and upwards compatible.
If BCS-2 is already installed, BCS-2 recognizes the existing installation and asks whether you want to update BCS-2. Confirm the prompt with “Yes”. In the form below, verify the path to the installation folder. After the final confirmation of the update, you will be taken to the BCS-2 setup.
6.6.1 Update BCS-2 V6.4 to V6.6
To ensure that the current installation environment is implemented correctly and completely when upgrading from BCS-2 V6.4 to V6.6, we recommend reinstalling BCS-2, exporting the BCS-2 configuration settings beforehand and then importing them into the new BCS-2 environment.
6.7 Move Job Directory with scans (ScanData)add section
The storage location of the job directory, which contains the job folders with all job-relevant information and the images for the jobs, can be changed after an installation. To do this, the path to the job directory is changed in the JOBS_CONFIG. file, which can be found in the data directory C:\ProgramData\ImageWareComponents\BCS2_V6_64. BCS-2 creates the job folder when the programme is started for the first time if it does not already exist.
6.8 Online Registrationadd section
In BCS-2, the Office Configurator or the Professional Administrator, open the tab “Administration” >> “Software Registration”:
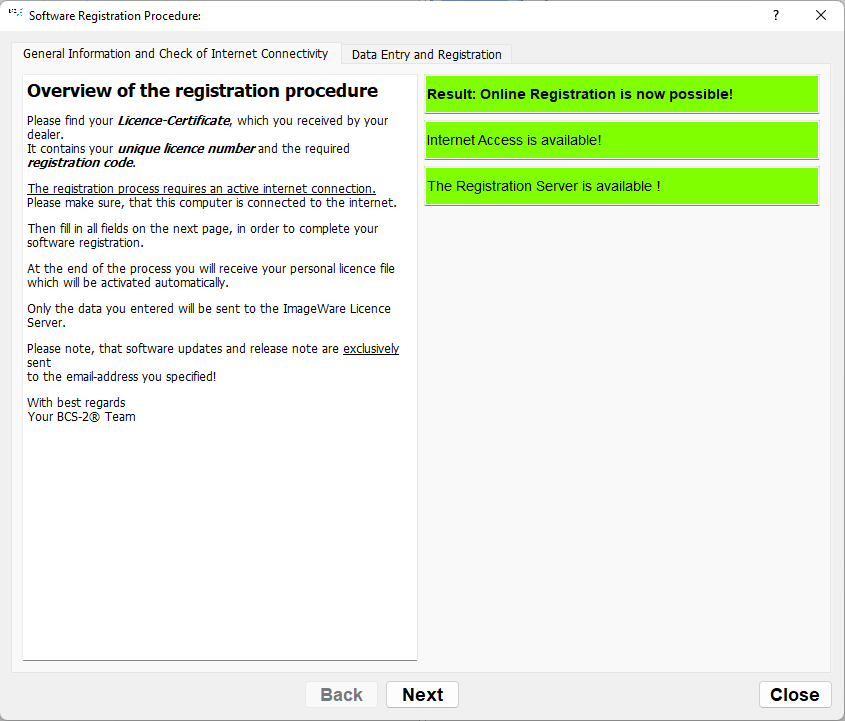
Important: Read the registration instructions. BCS-2 first checks whether online or email registration is possible. To enter your data, click on the “Next” button or select “Data entry and registration” in the menu bar of the online registration.
Fill in the requested form. You can find the license number and registration code on your license certificate. The system ID is automatically determined and inserted by BCS-2.
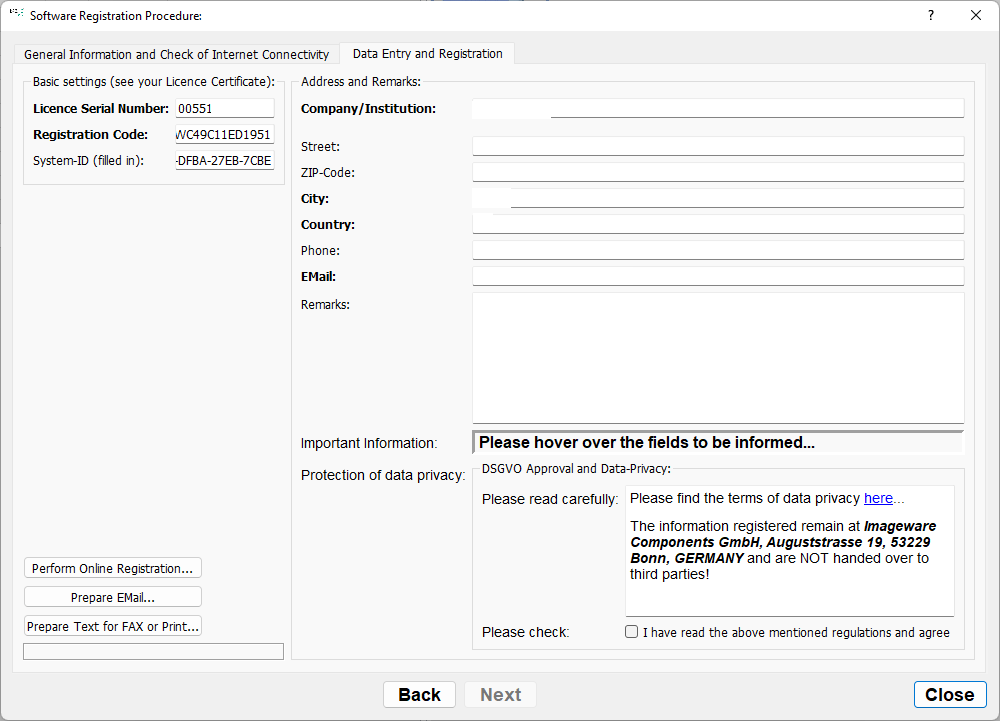
Click on “Perform online registration”. BCS-2 validates your data. Confirm the binding registration of your license by clicking on “Yes”.
After the successful registration, BCS-2 saves the license file on your machine.
6.9 Manual License Request and Registrationadd section
After an automatic check, BCS-2 indicates whether licensing can be carried out online.
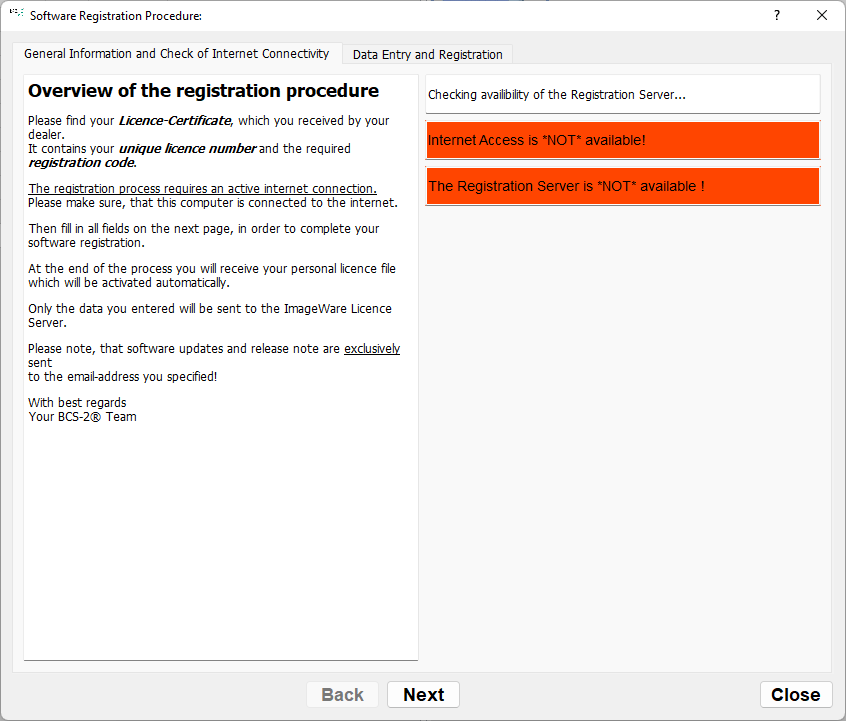
If online registration is not possible, click on the “Next” button to enter the registration data or select “Data entry and registration” in the menu bar of the online registration and fill out the form that opens. Now click on the button “Prepare e-mail for sending” or “Prepare text for printing/faxing”. Then send the license request by email to licence@imageware.de. We will then email you your license file immediately.
After ImageWare has sent the licensing file, start BCS-2 using the icon on your desktop and select “Import license…” from the “Administration” menu.

Navigate to the directory on your computer where the license file is located and select the desired file. BCS-2 automatically validates and imports the license. A restart of BCS-2 is then required.