

2. Indexing in the structure treeadd chapter
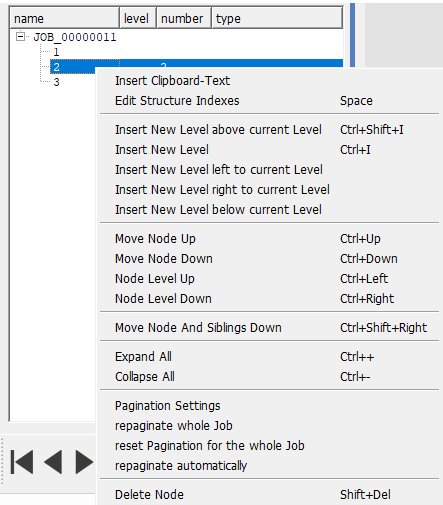
The administrator controls the indexing for a workflow via a structure tree by creating job structure indexes. The structure index is represented by a tree-like presentation, displayed below the usual thumbnail bar. Indexing and pagination is done directly via the structure tree. A prerequisite for using indexing in the structure tree is the selection of the “eL Editor” workflow as the basis for the job.
You call up the processing form by clicking on the space bar or the corresponding link in the structure tree.
Automate the creation of the first structure node in the structure tree by activating the checkbox “Automatically create the first structure node when creating a job” in the Basic tab.
2.1 Hierarchical structuring via a structure treeadd section
Use the arrow keys to navigate through the tree, create new nodes, or move nodes within the tree.
Alternatively, you can also perform actions for the currently selected node via the ‘Context Menu’, accessible by right-clicking.
The following actions are possible:
- Insert Clipboard-Text: BCS-2 takes the result of the last zoned OCR directly as node text (“chapter or page text”, see OCR).
- Edit Structure Indexes: Opens the dialog for editing the node in which you edit the name, (page) number, and type. The level is not editable. It results automatically from the hierarchy level.
- Insert New Level above current Level: Use CTRL-SHIFT-I, transaction #9723 or the context menu in the structure tree to create a new “chapter” for the current page (or for the current node). This means that BCS-2 inserts a new level “above” and transfers all pages from the current page that are on the same hierarchical level to the new chapter.
- Insert New Level: Creates a new node whose hierarchy is below the current hierarchy level.
- Insert New Level left to current Level: Creates a new node of the same hierarchy level above the selected page.
- Insert New Level right to current Level: Creates a new node of the same hierarchy level under the selected page.
- Insert New Level below current Level: Creates a new node below the current hierarchy level.
- Move Node Up: The node (along with its pages) is moved up within the hierarchy level (by one image).
- Move Node Down: The node – along with its pages – is moved down one image within the hierarchy level.
- Node Level Up: The hierarchy level of the selected node is moved up one level.
- Node Level Down: The hierarchy level of the selected node is moved down one level.
- Move Node And Siblings Down: The hierarchy level of the selected node is moved down one level.
- Expand All: BCS-2 displays all nodes and pages.
- Collapse All: BCS-2 displays only the nodes.
- Delete Node: BCS-2 deletes the node (NOT the image).
2.2 Paginationadd section
Default Setting
BCS-2 restores the default setting by clicking on “Reset pagination”:
- Start of counting at “1”
- Counting method “Decimal”
- Mode: “inherited from predecessor/parent node”
Supported counting methods
- Inherited from predecessor/father node (DEFAULT)
- NO pagination (see below): Means: BCS-2 retains the associated structure index (default is the “index name”, manual input). The internal count is not incremented.
- Decimal
- Roman (big digits)
- Roman (small digits)
- Small letters (a-z)
- Capital letters (A-Z)
For all counts – except NO PAGINATION – BCS-2 increases the internal counter by one (the defined value). If a page has a new start value in its pagination settings, BCS-2 uses this again according to the counting method from this page and counts up accordingly.
Pagination menu
Call up the pagination and indexing menu by right-clicking on the page or node to be defined. The following options are available in the context menu:
- Invoke the pagination dialog for the node
- Rerun pagination for entire job
- Reset pagination completely
- Automatically repaginate – This function is not page or node-specific, but can be activated for the job (also via menu/job). It is switched off by default because it may slow down the application or the processing is too expensive if you are doing a lot of post-processing. If the option is active, BCS-2 automatically renumbers after inserting, splitting and deleting pages.
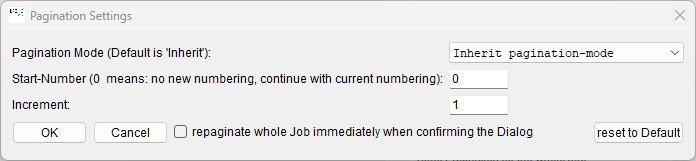
Pagination Dialog
In the pagination dialog, define the following options for the selected node:
- Counting,
- Start value (0 means no new start value is set)
- Request new pagination (repaginate the complete job)
- OP: The value of the internal counter
Visualization
Since the overview of where the pagination was changed is quickly lost in large jobs, BCS-2 marks these nodes:
- BCS-2 marks nodes with individual pagination settings with a colored star.
- BCS-2 also displays the current structure of the job in the job overview and marks the relevant nodes there in the same way.
Pagination – Rename images on transfer
To rename the image names during transfer, the workflow must be configured as follows:
- The workflow has a job index in which the initial number is stored (e.g. in the job index 1= initial number)
- One of the following expressions is stored under file name in the transfer target for the images, depending on whether you need leading zeros or not:
- $ ut.formatNumber(Number(job.index3) + Number(page.pageNumber) – 1)$
- $ Number(job.index1) + Number(page.pageNumber) – 1$
Example:
The images should be incremented from 5760. The user enters the corresponding value in “Job Index 1”.
File name should be: $ ut.formatNumber(Number(job.index3) + Number(page.pageNumber) – 1)$
Result: 00005760, 00005761, 00005762
File name should be:$ Number(job.index1) + Number(page.pageNumber) – 1$
Result: 5760, 5761, 5762

The functions:
- Pagination Settings
- repaginate whole Job
- reset Pagination for the whole Job
- repaginate automatically are
also available via the Job menu.
2.3 Generation of the eL XML OCR data in the jobadd section
For the import into the eL, it may be necessary that the relevant OCR information is available for each page. These OCR formats are either generated manually for each page or – the better method – using one of the following job operations in the “Job” menu:
- Execute operation on the job
- Perform OCR for all pages.
- Create MyBib eL format.
2.4 Zoned OCRadd section
The “Zoned OCR to clipboard” function is available in the context menu of the viewer for the direct transfer of texts to the clipboard.
With this new technique, it is very easy to generate OCR data and to assign corresponding objects (nodes):
- In the structure tree: Right-click on the respective node and select “Insert text from ClipBoard”.
- At any point: select the element and use CONTROL-V to insert the text content of the clipboard.